
 Tweet
Tweet
Aside from their blazing-fast speeds, SSDs are typically more reliable than hard drives. But that doesn’t mean they’re infallible. In fact, constantly subjecting your old SSD to write operations will make it vulnerable to bad sectors, corruption, and other issues.
Luckily, you can use certain Terminal commands, DIY fixes, and third-party apps to restore an SSD, and this article covers each method to help you salvage your malfunctioning drive.
How to check the SSD for errors in Windows
Windows 11 has an error-checking utility that’s good enough for basic SSD troubleshooting. You can follow these steps to launch the tool.
- Open File Explorer.
- Right-click on the faulty drive and choose Properties.
- Navigate to the Tools header and select Check under the Error-checking section.
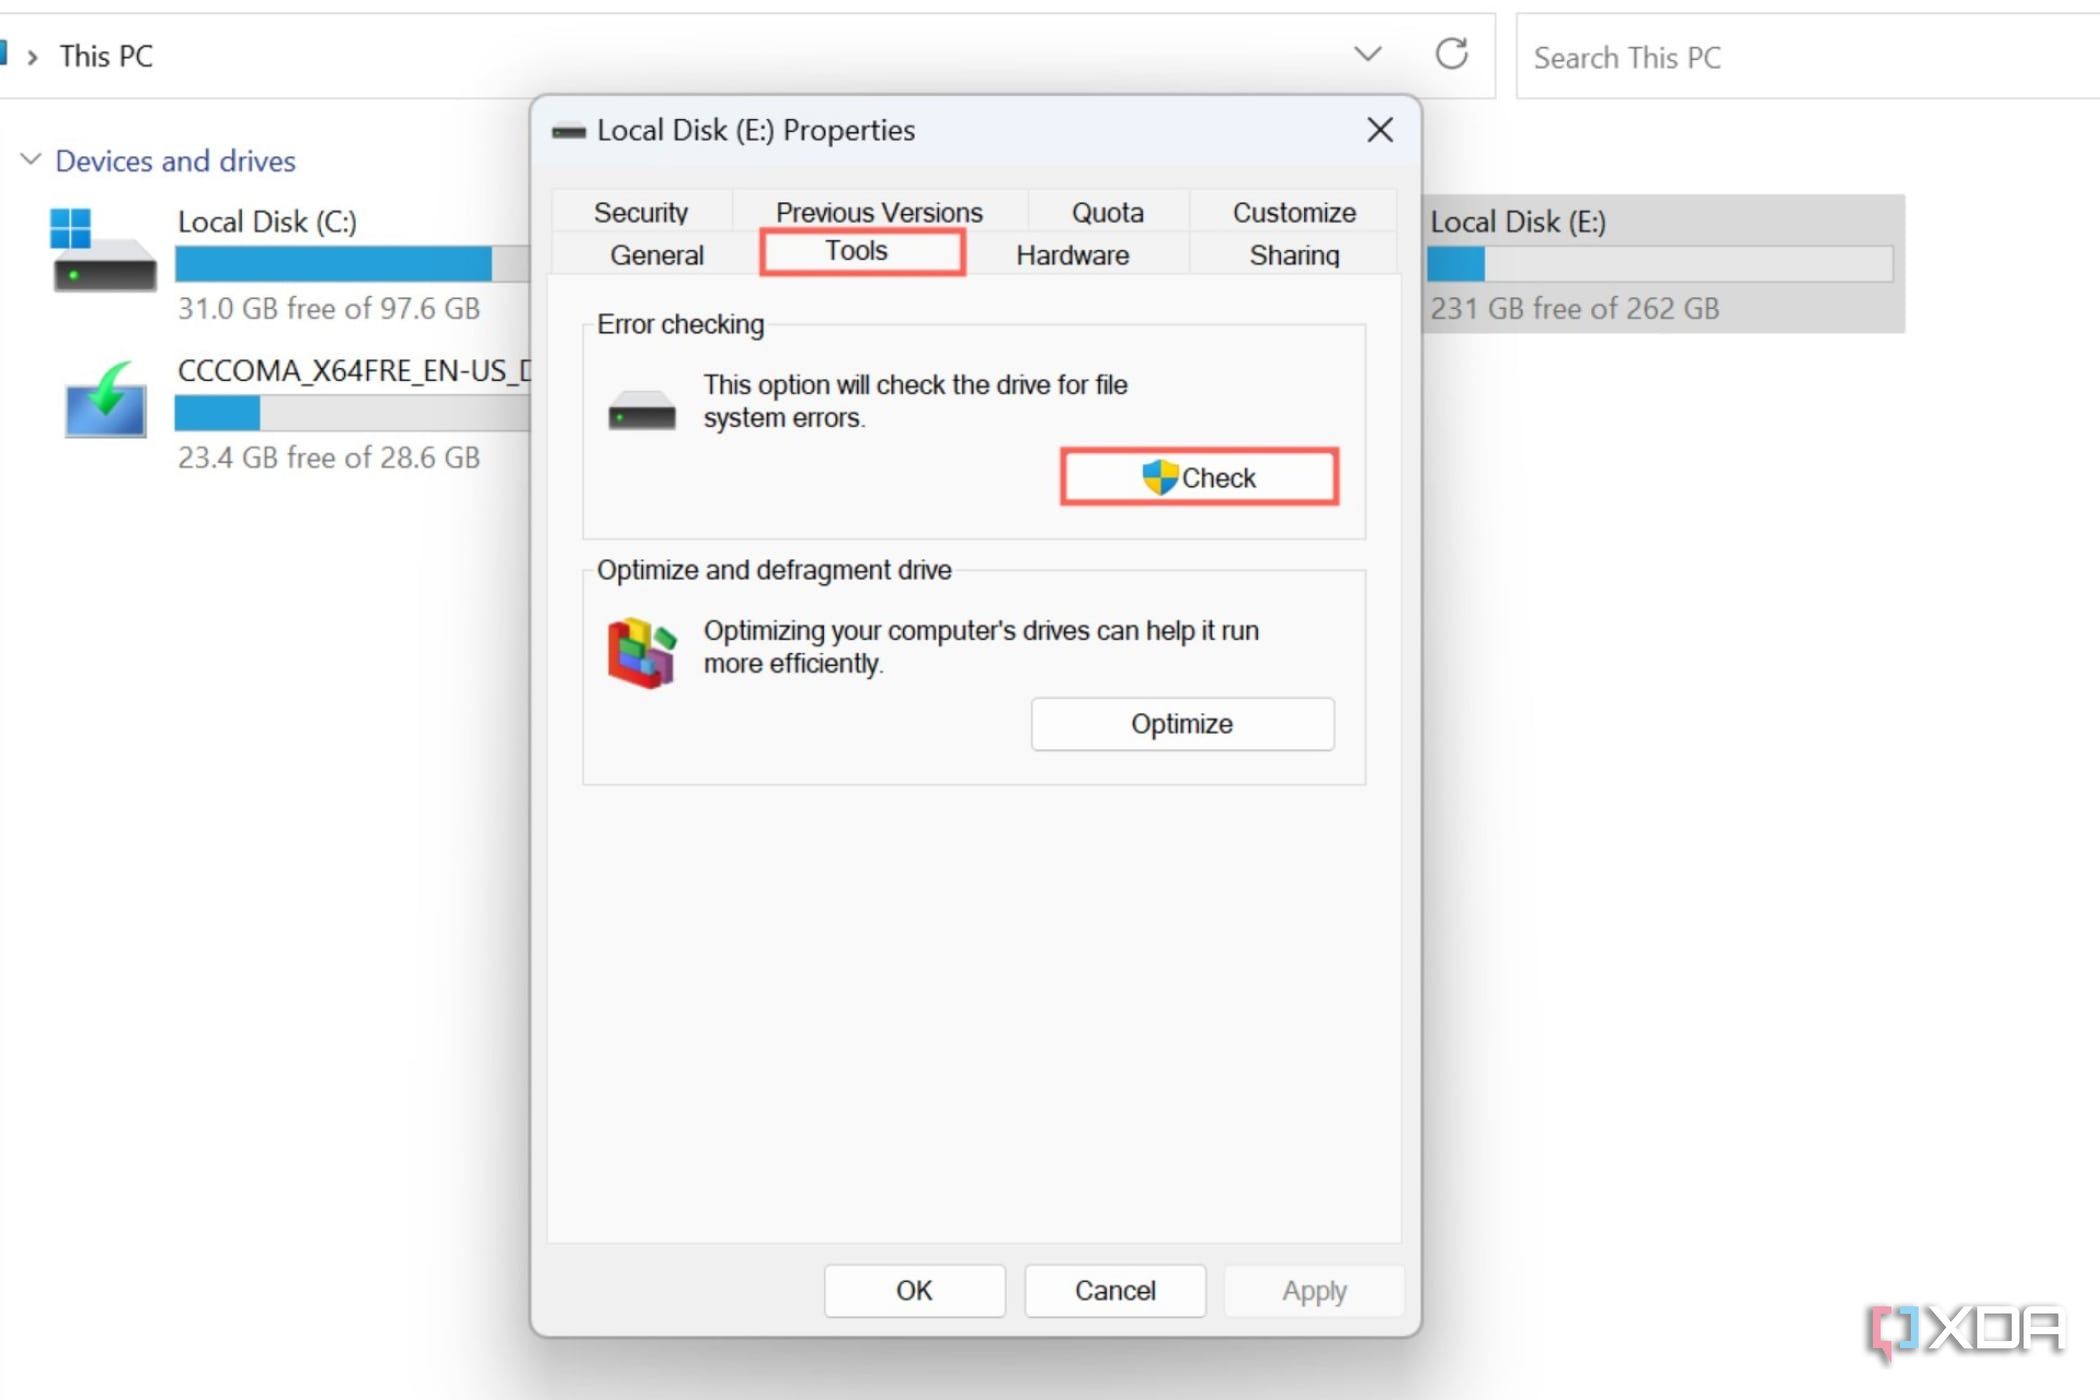
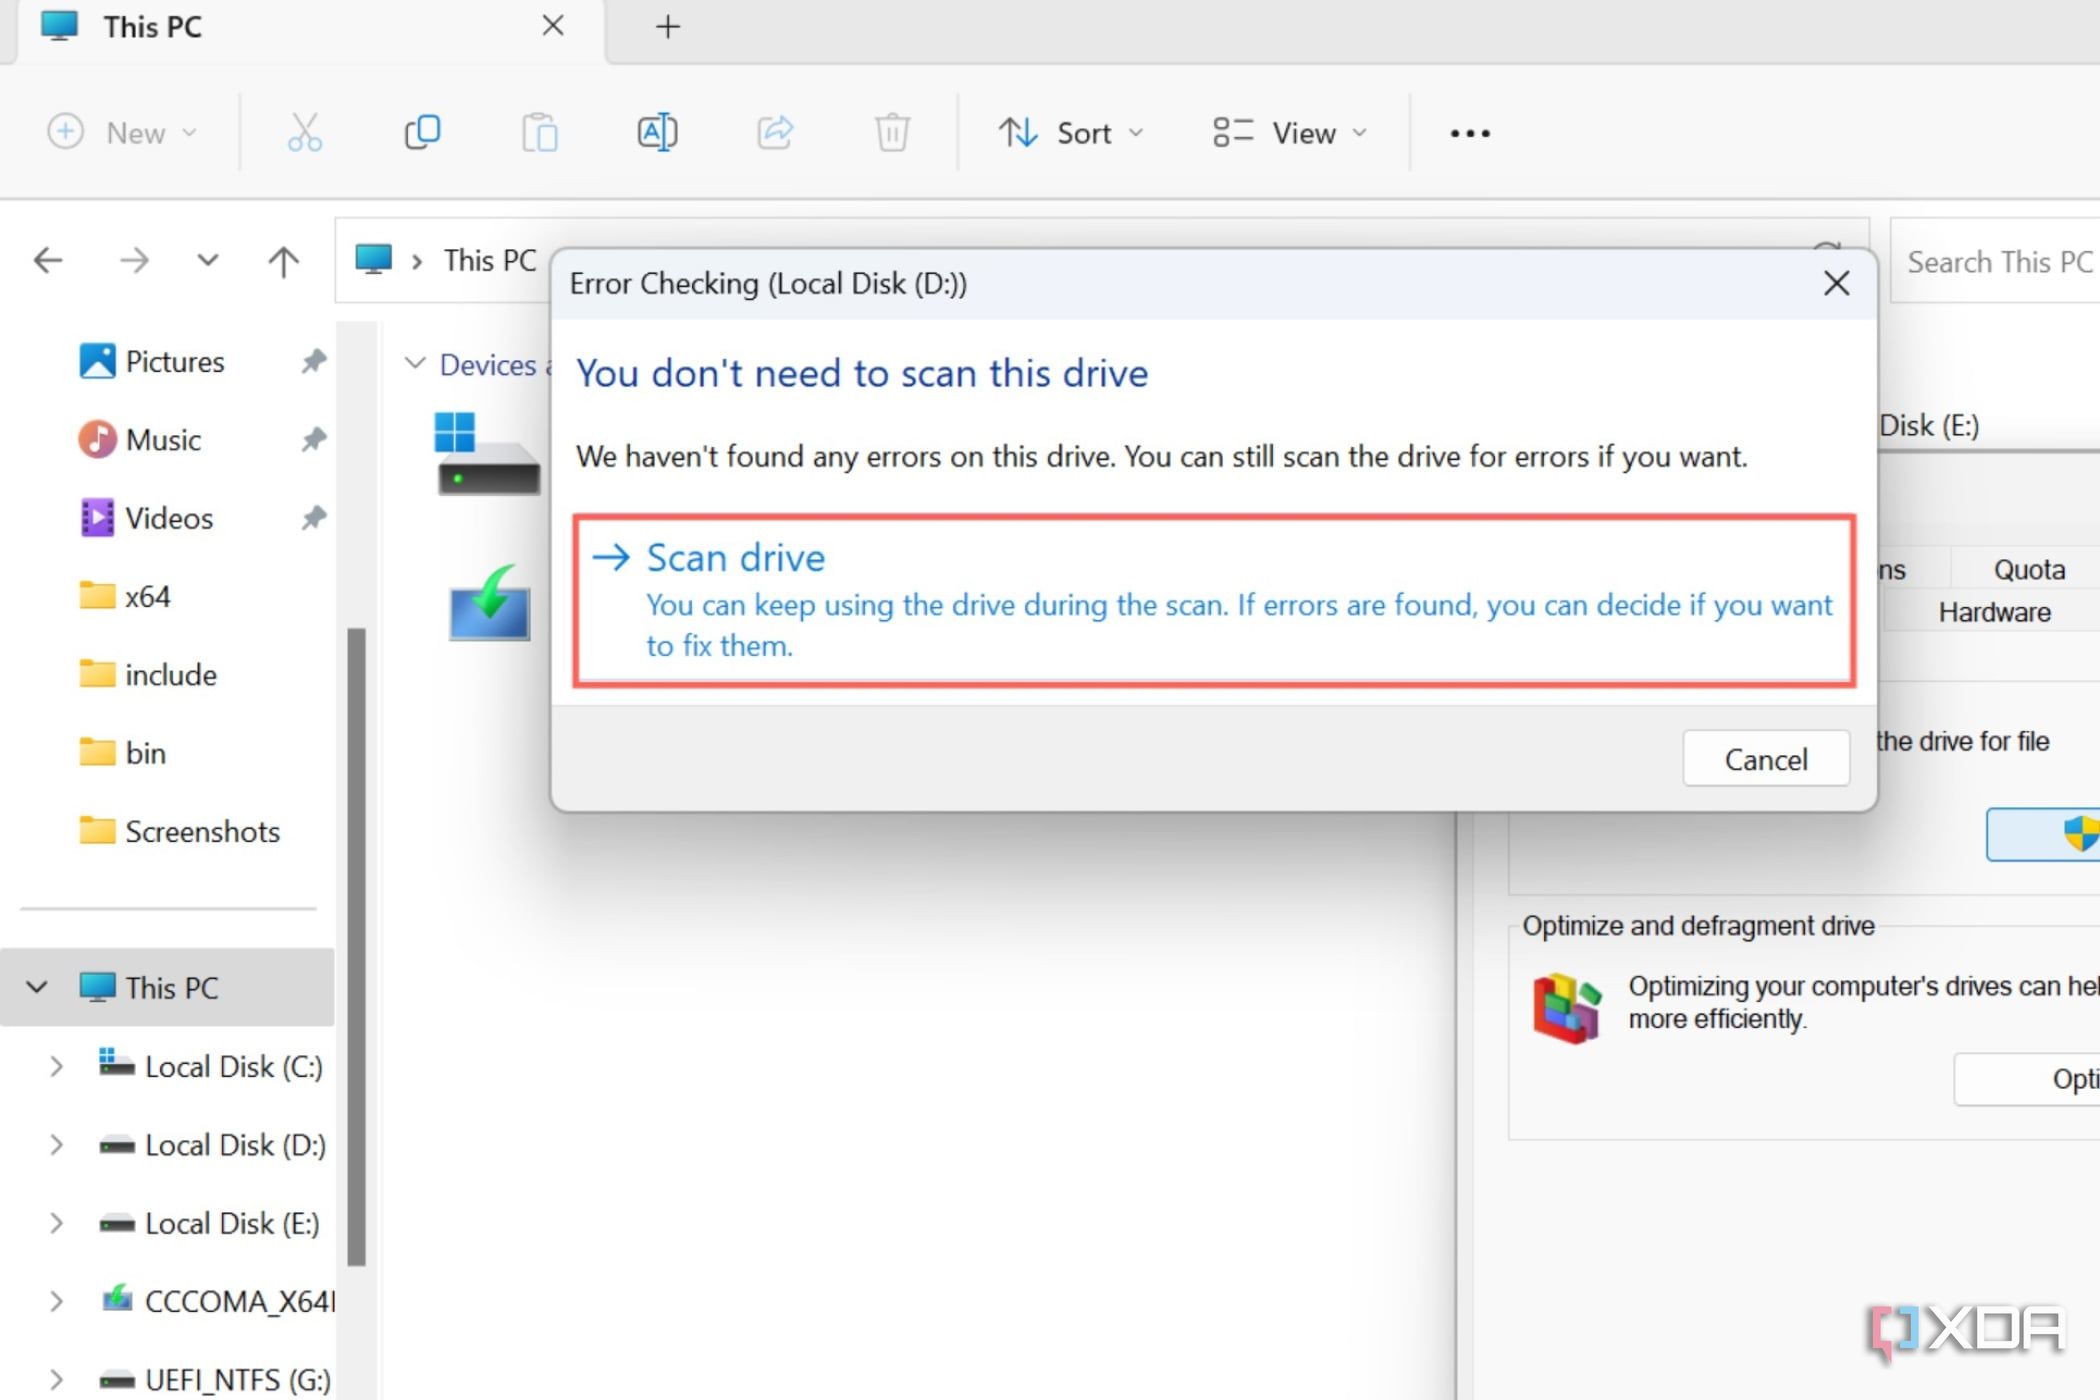
- Choose the Scan Drive option from the pop-up window.
How to check the SSD for errors using CrystalDiskInfo
Since the aforementioned Windows tool doesn’t give a detailed report of the errors, you can use a third-party application like CrystalDiskInfo on your SSD’s health.
- Download CrystalDiskInfo from the official website and extract the .zip folder once it has finished downloading.
- Run DiskInfo64.exe with admin privileges.
- You can see the Health Status of the drive in the top-left corner of the app.
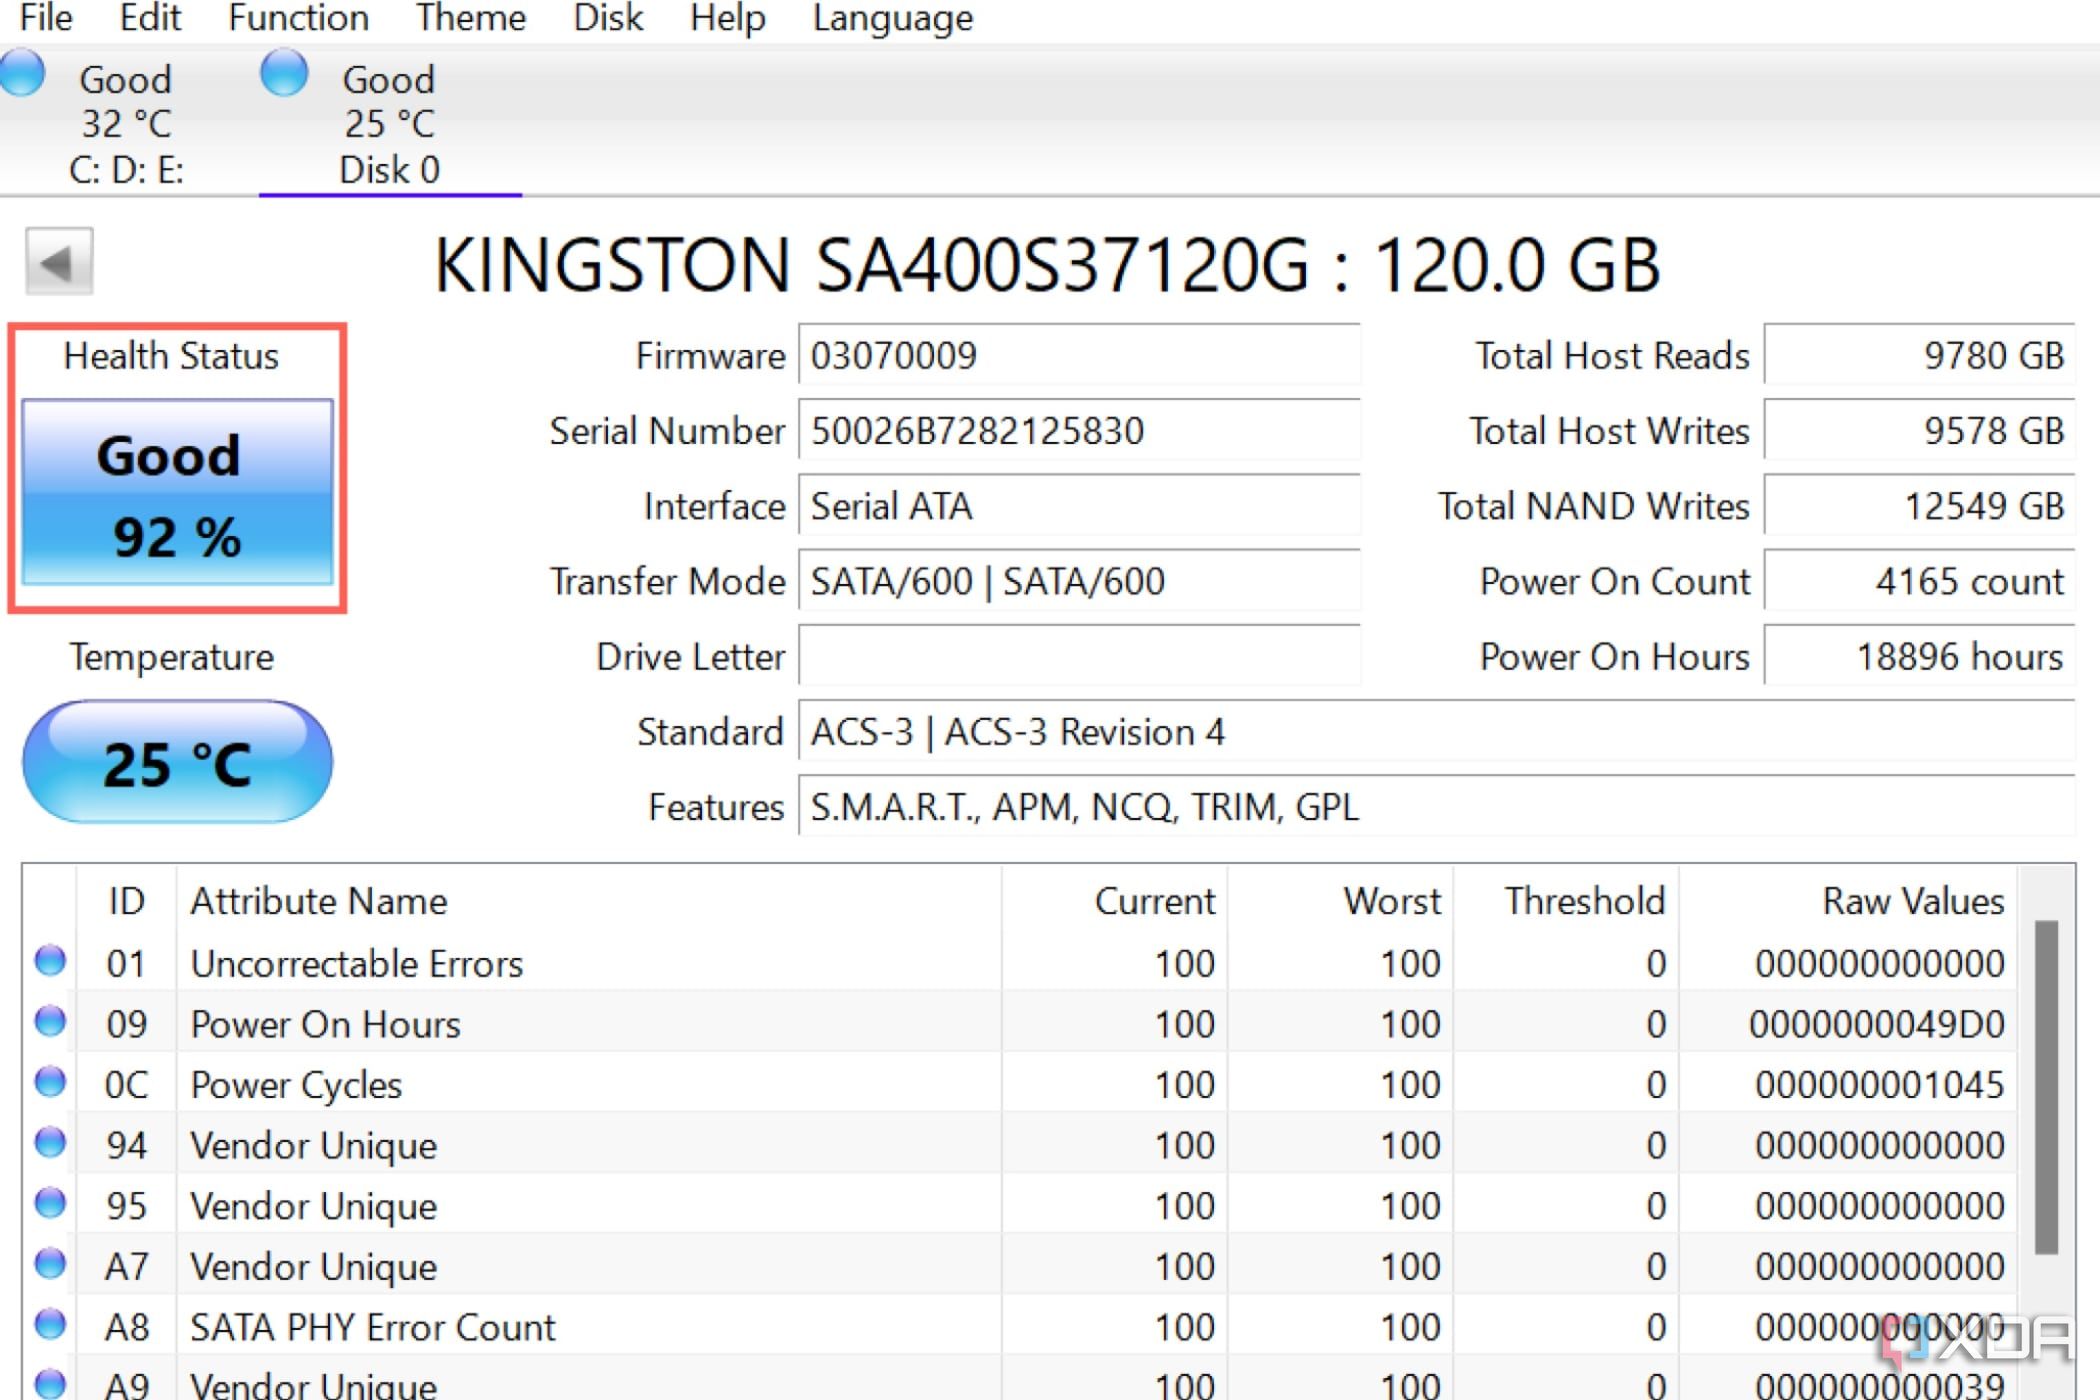
If the app shows your SSD health as “Good,†then you’re in the clear. But if the drive health indicator reads “Caution†or “Bad,†you should back up your PC and then move on to the actual fixes.
How to fix your SSD by updating the drivers and firmware
Installing the latest drivers is the first thing you should do for any malfunctioning hardware, including the SSD.
- Right-click on the Start button and select Device Manager.
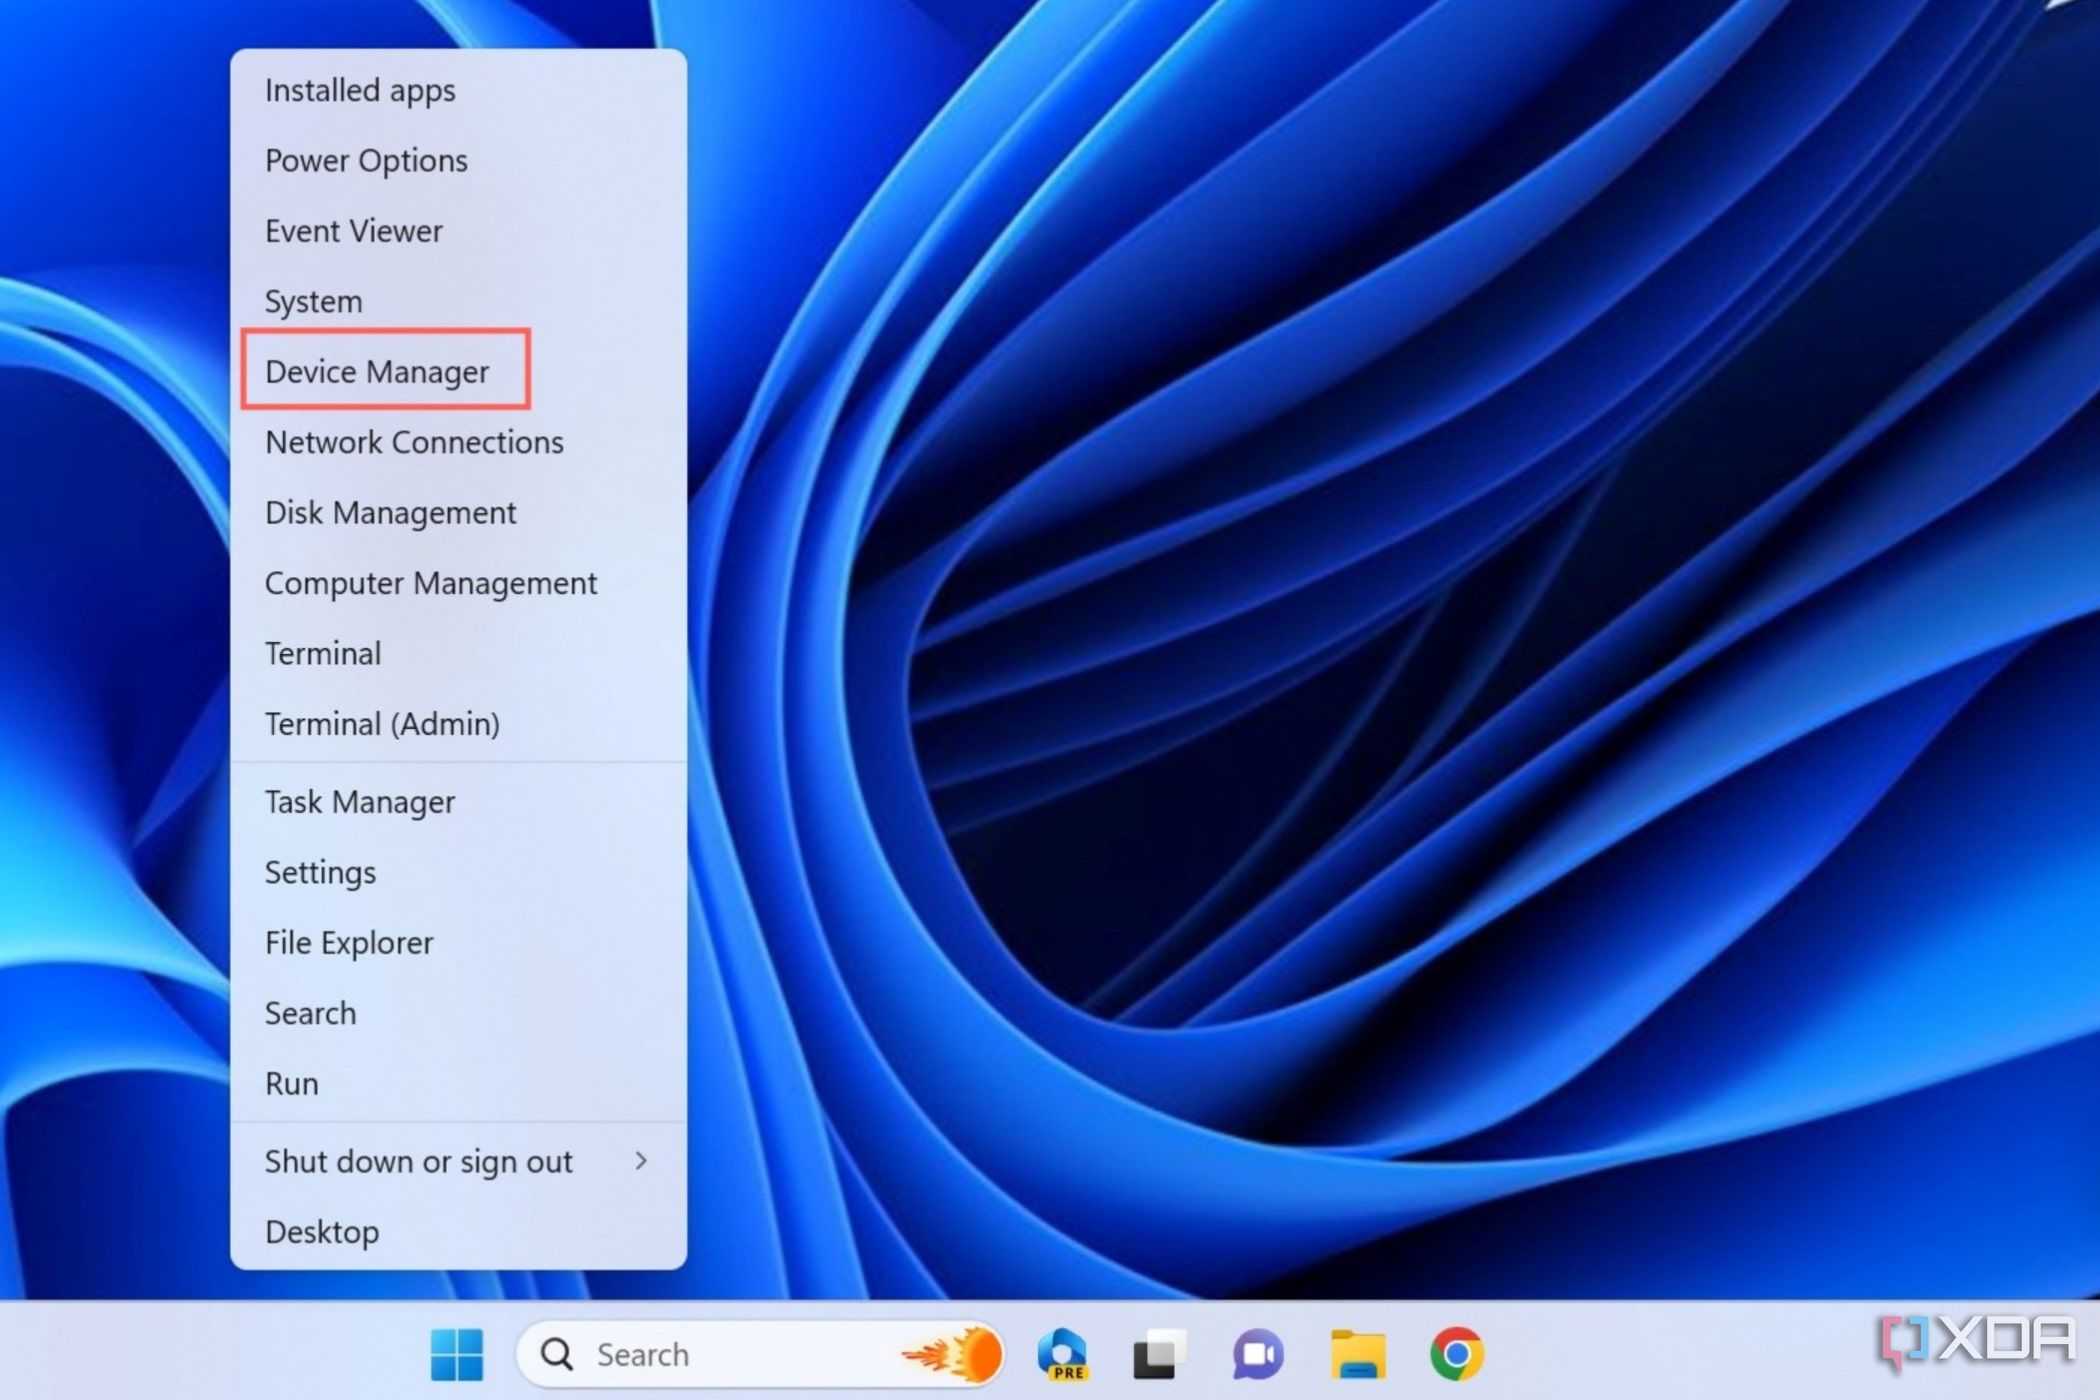
- Click on the Arrow next to Disk drives.
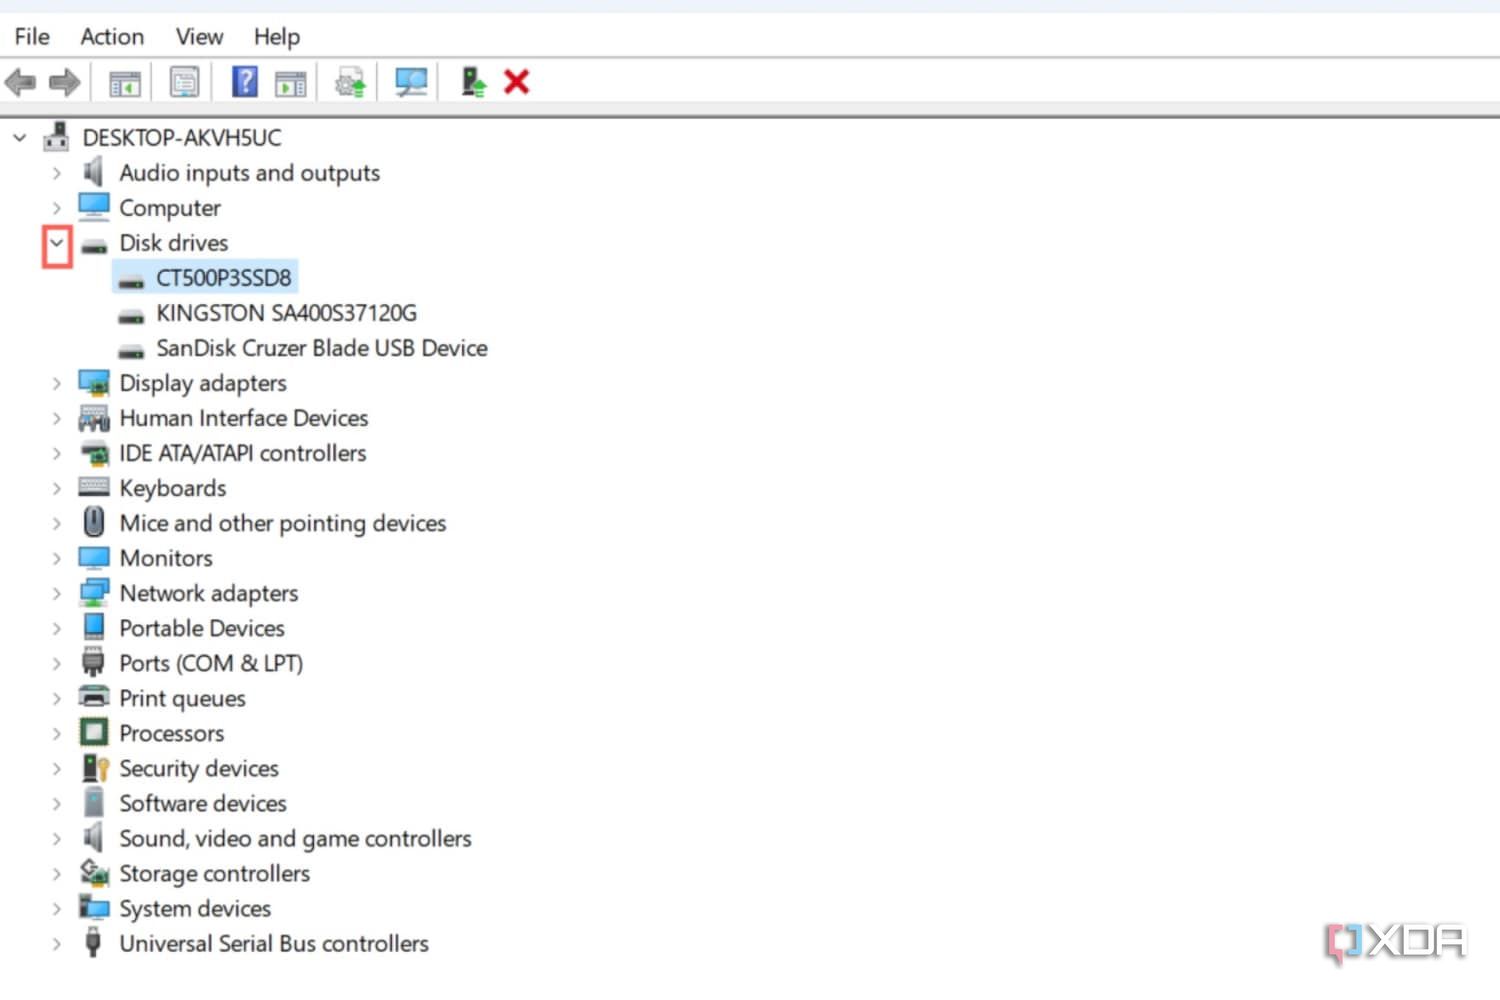
- Right-click on the defective SSD and select Update drivers.
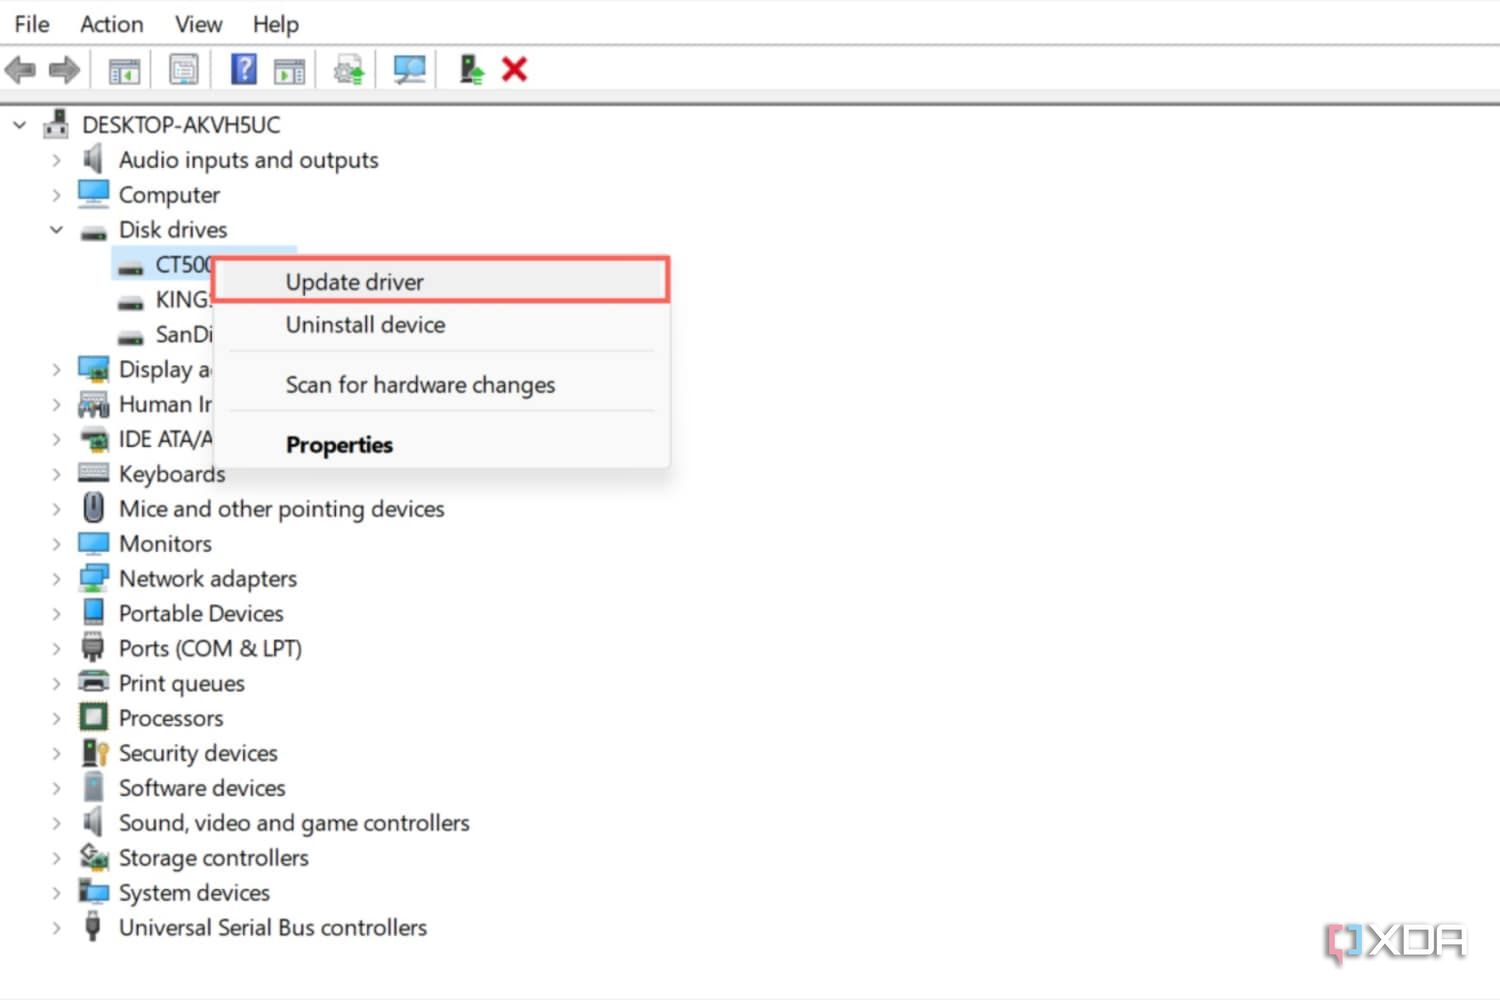
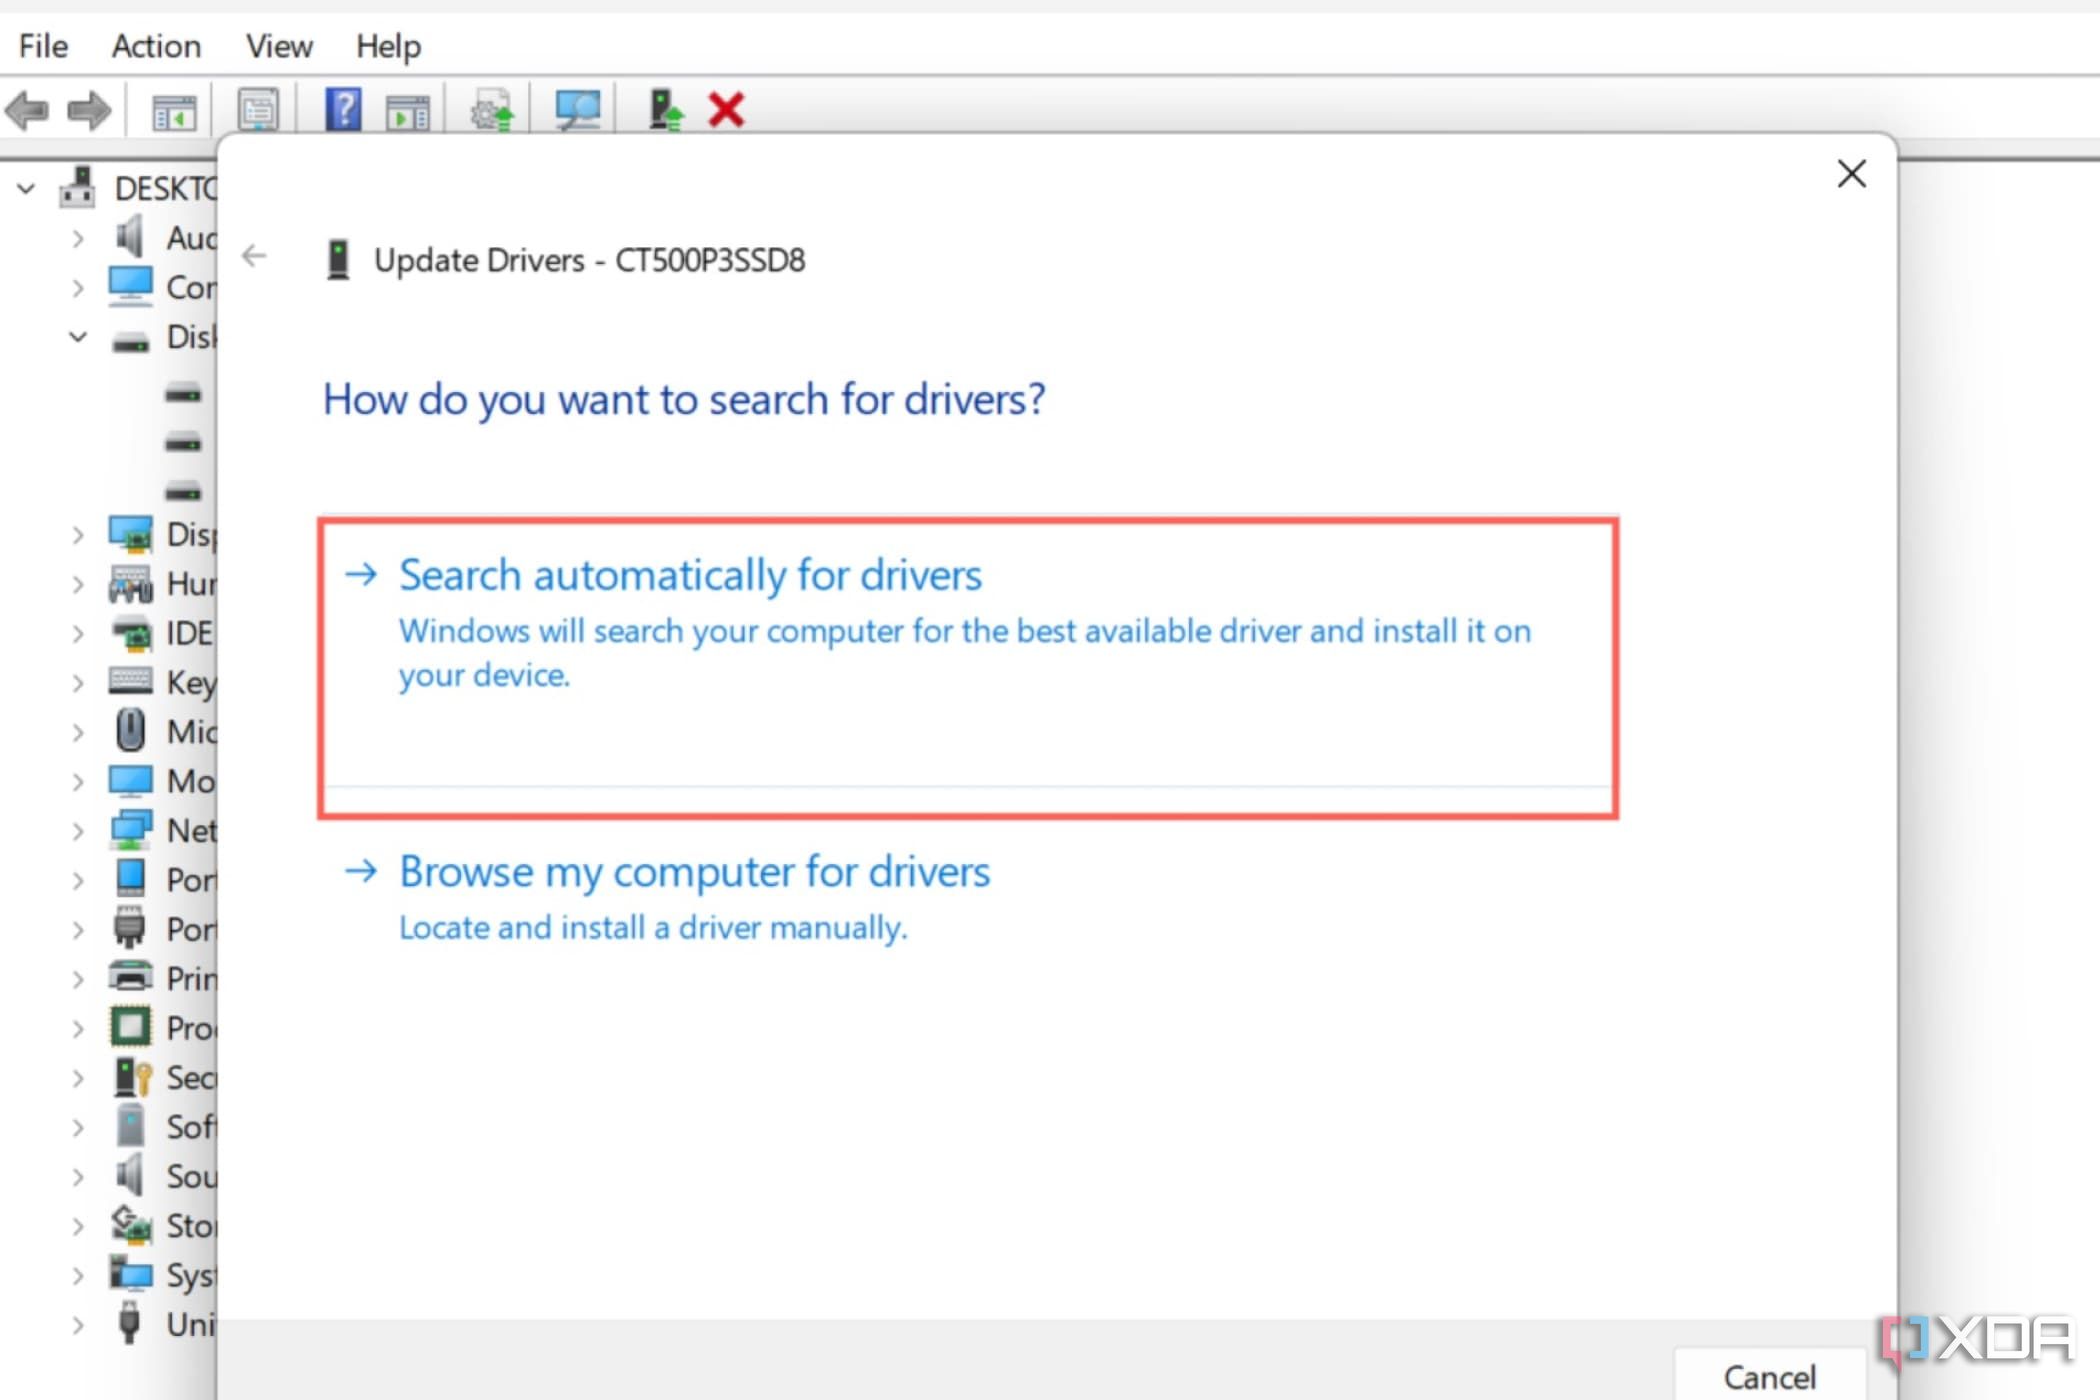
- Click on Search automatically for drivers and wait for Windows to install the latest drivers for the SSD.
Next, you should update the firmware to its latest version. You can copy the model name of the SSD from the Device Manager and browse the manufacturer’s website for the latest firmware that’s compatible with your drive.
How to fix your SSD using the power cycle method
If your SSD doesn’t even show up on your PC, or updating the drivers and firmware doesn’t fix it, you can try using the power cycle method. It’s a simple yet effective solution to soft reset the SSD without deleting the user data stored within.
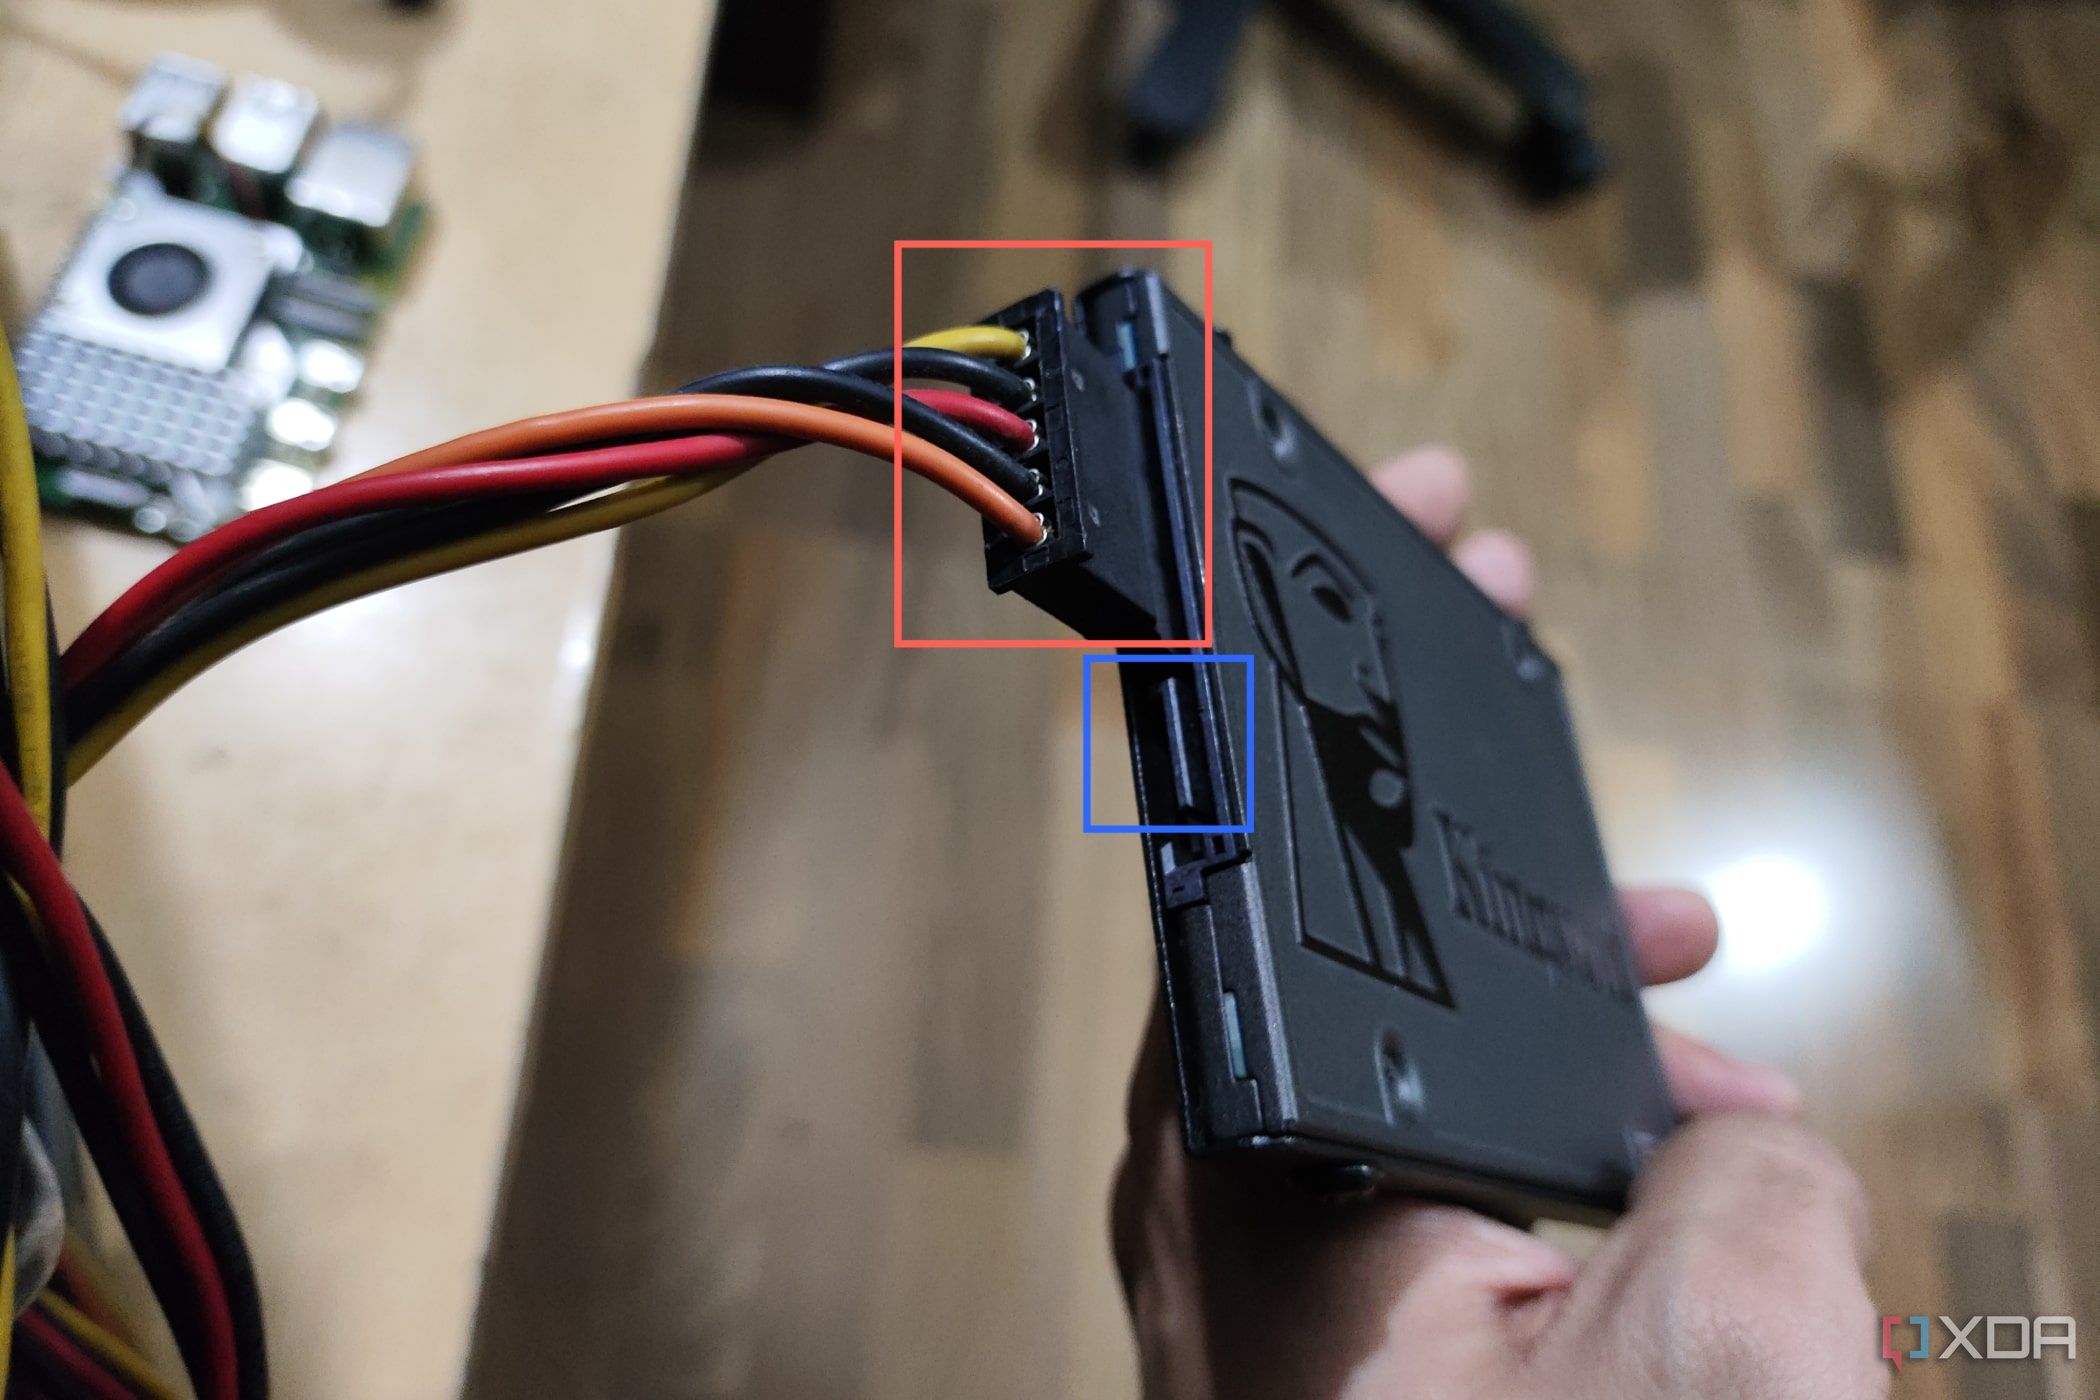
- Power off your PC, unplug the AC adapter, and unmount the side panels of its case to gain access to the SSD.
- Pull out the SATA data cable but leave the power cable plugged in.
- Restart your PC and keep pressing the Delete key to enter the BIOS.
- Stay in the BIOS for an hour.
- Unplug the power cable from the SSD for a minute or two.
- Insert both the SATA data and power cables into the SSD and reboot your PC after mounting the side panels you removed earlier.
If you’re using an NVMe SSD, then you can skip to step 3. Once you’ve left your PC running for an hour, shut it down, and remove all residual power by holding the power button for 30 seconds.
Once the PC reboots, you should be able to access the drive. Even if it doesn’t fully repair your SSD, this DIY hack can revive it long enough for you to back up all your important data to another storage device.
Alternatively, you can repeat the process by changing the SATA cable and plugging it into a different port on the motherboard. If you have more than one NVMe interface on your motherboard, you can try plugging your M.2 drive into the other slot.
How to fix your SSD using BIOS settings
In case your PC doesn’t recognize the SSD even after the power cycle method, the drive may be set to a different storage interface than the one it’s intended to be used with. You can use the BIOS settings to switch to a different storage mode on the motherboard.
- Restart your system, and keep tapping the Delete key as it boots up.
- Change the SATA Mode from AHCI to RAID (or vice versa, if RAID was set as the default option).
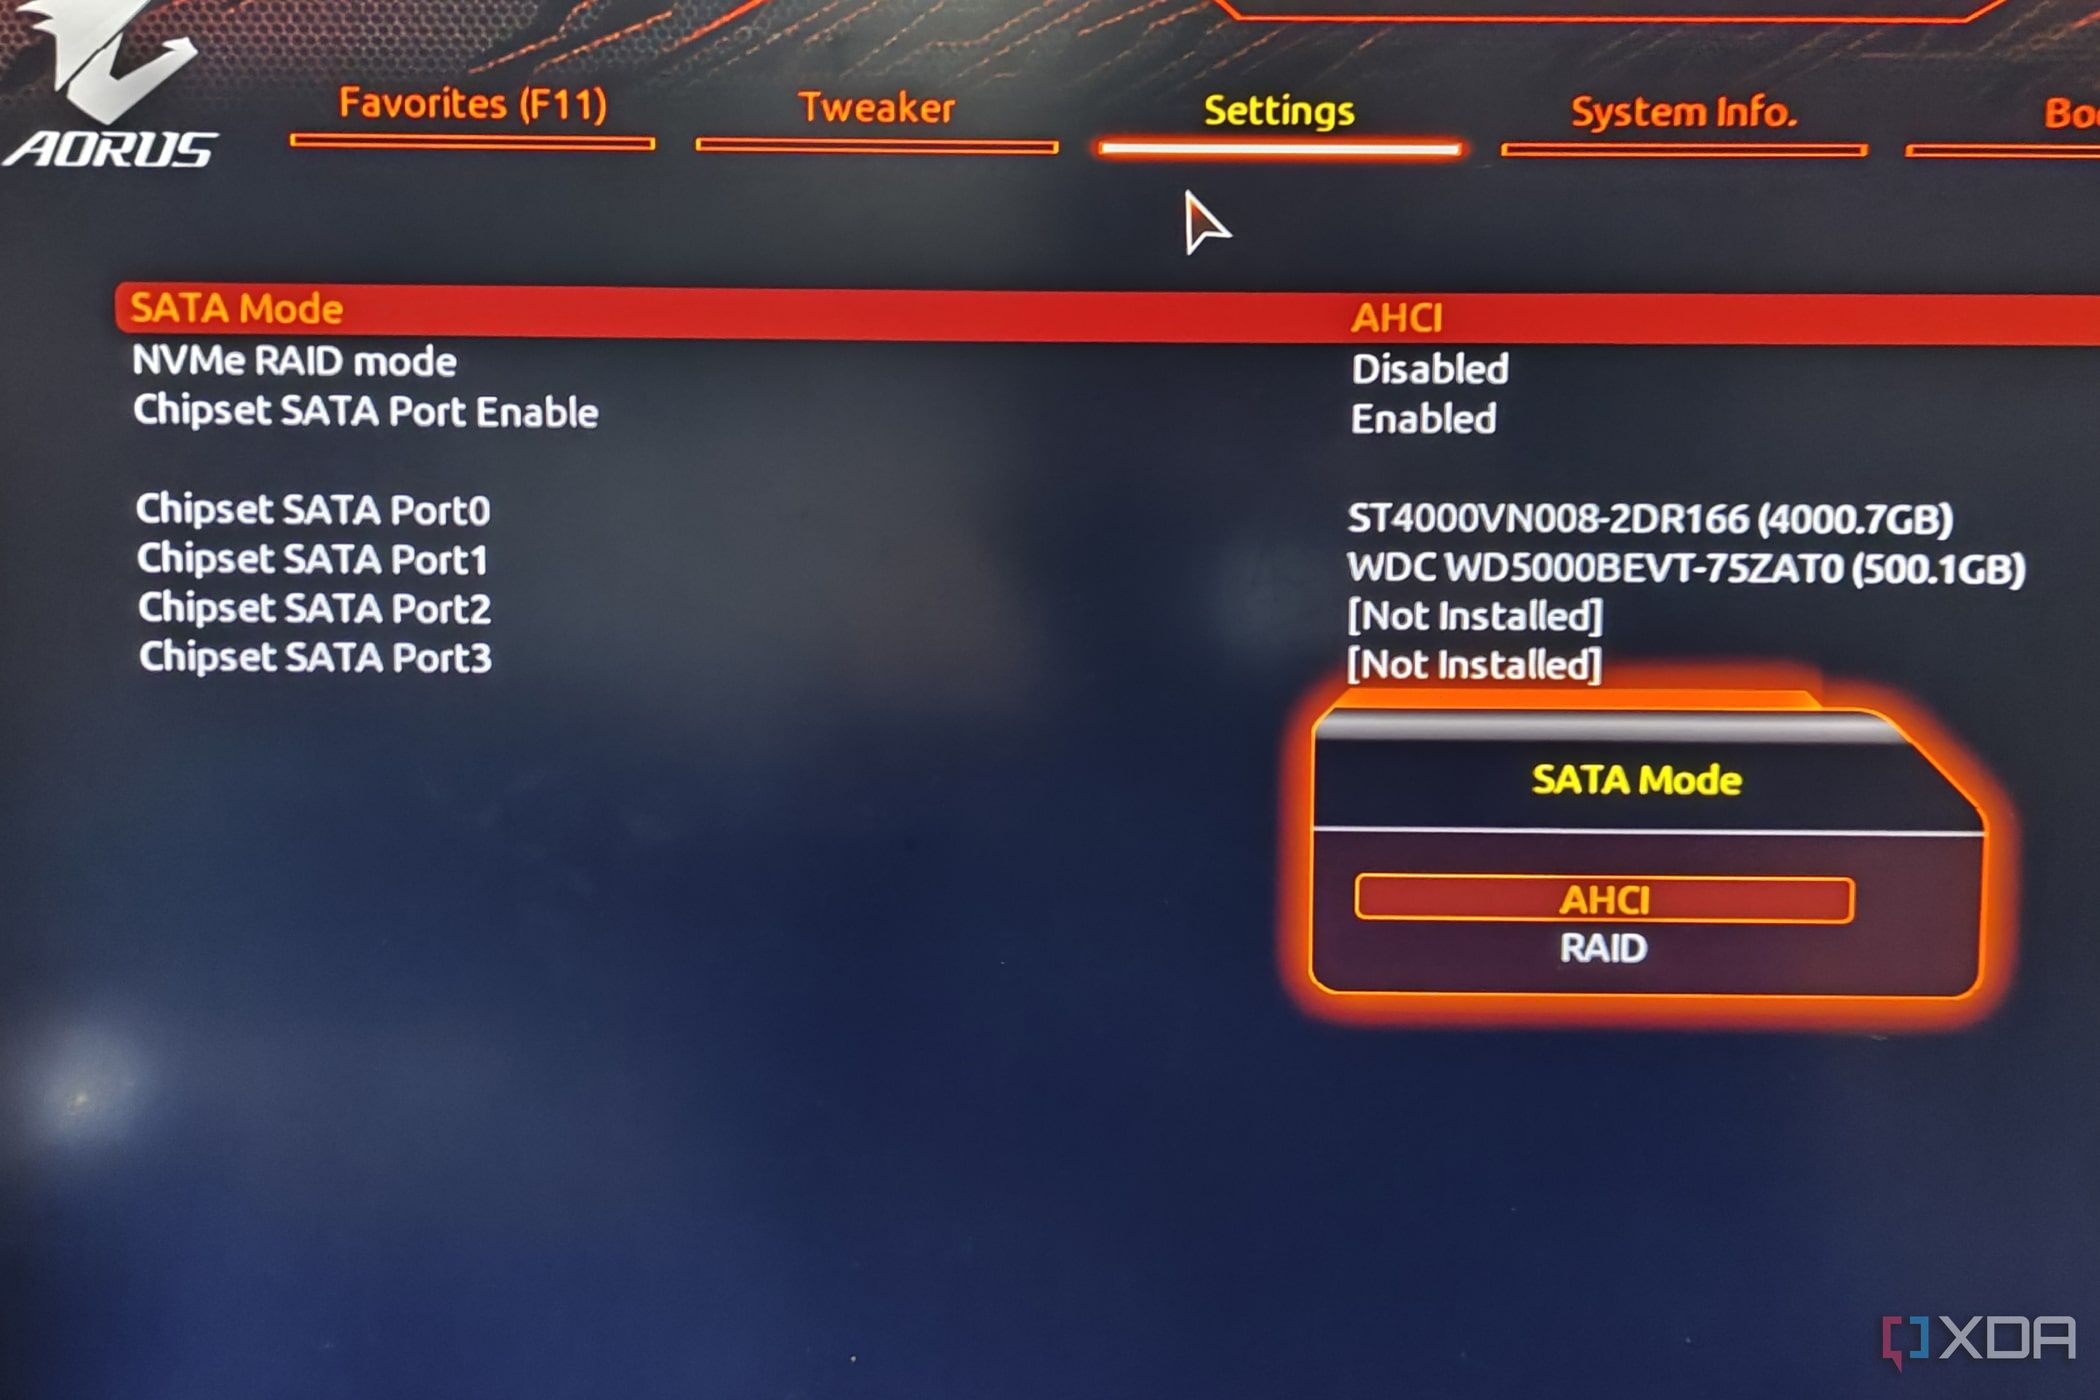
- Save the BIOS settings, and reboot your PC normally.
How to fix your SSD using the CHKSDK command
The Terminal in Windows 11 supports certain useful commands to diagnose and repair your SSD. The CHKDSK method is ideal for troubleshooting the drive, and it even includes certain parameters (/f, /r, and /x) to get rid of corrupted data.
- Right-click on the Start button and select Terminal (Admin).

- Grant administrator privileges to the Terminal when prompted by User Account Control.
- Type the following command and press Enter.
chkdsk drive_name: /f /r /x
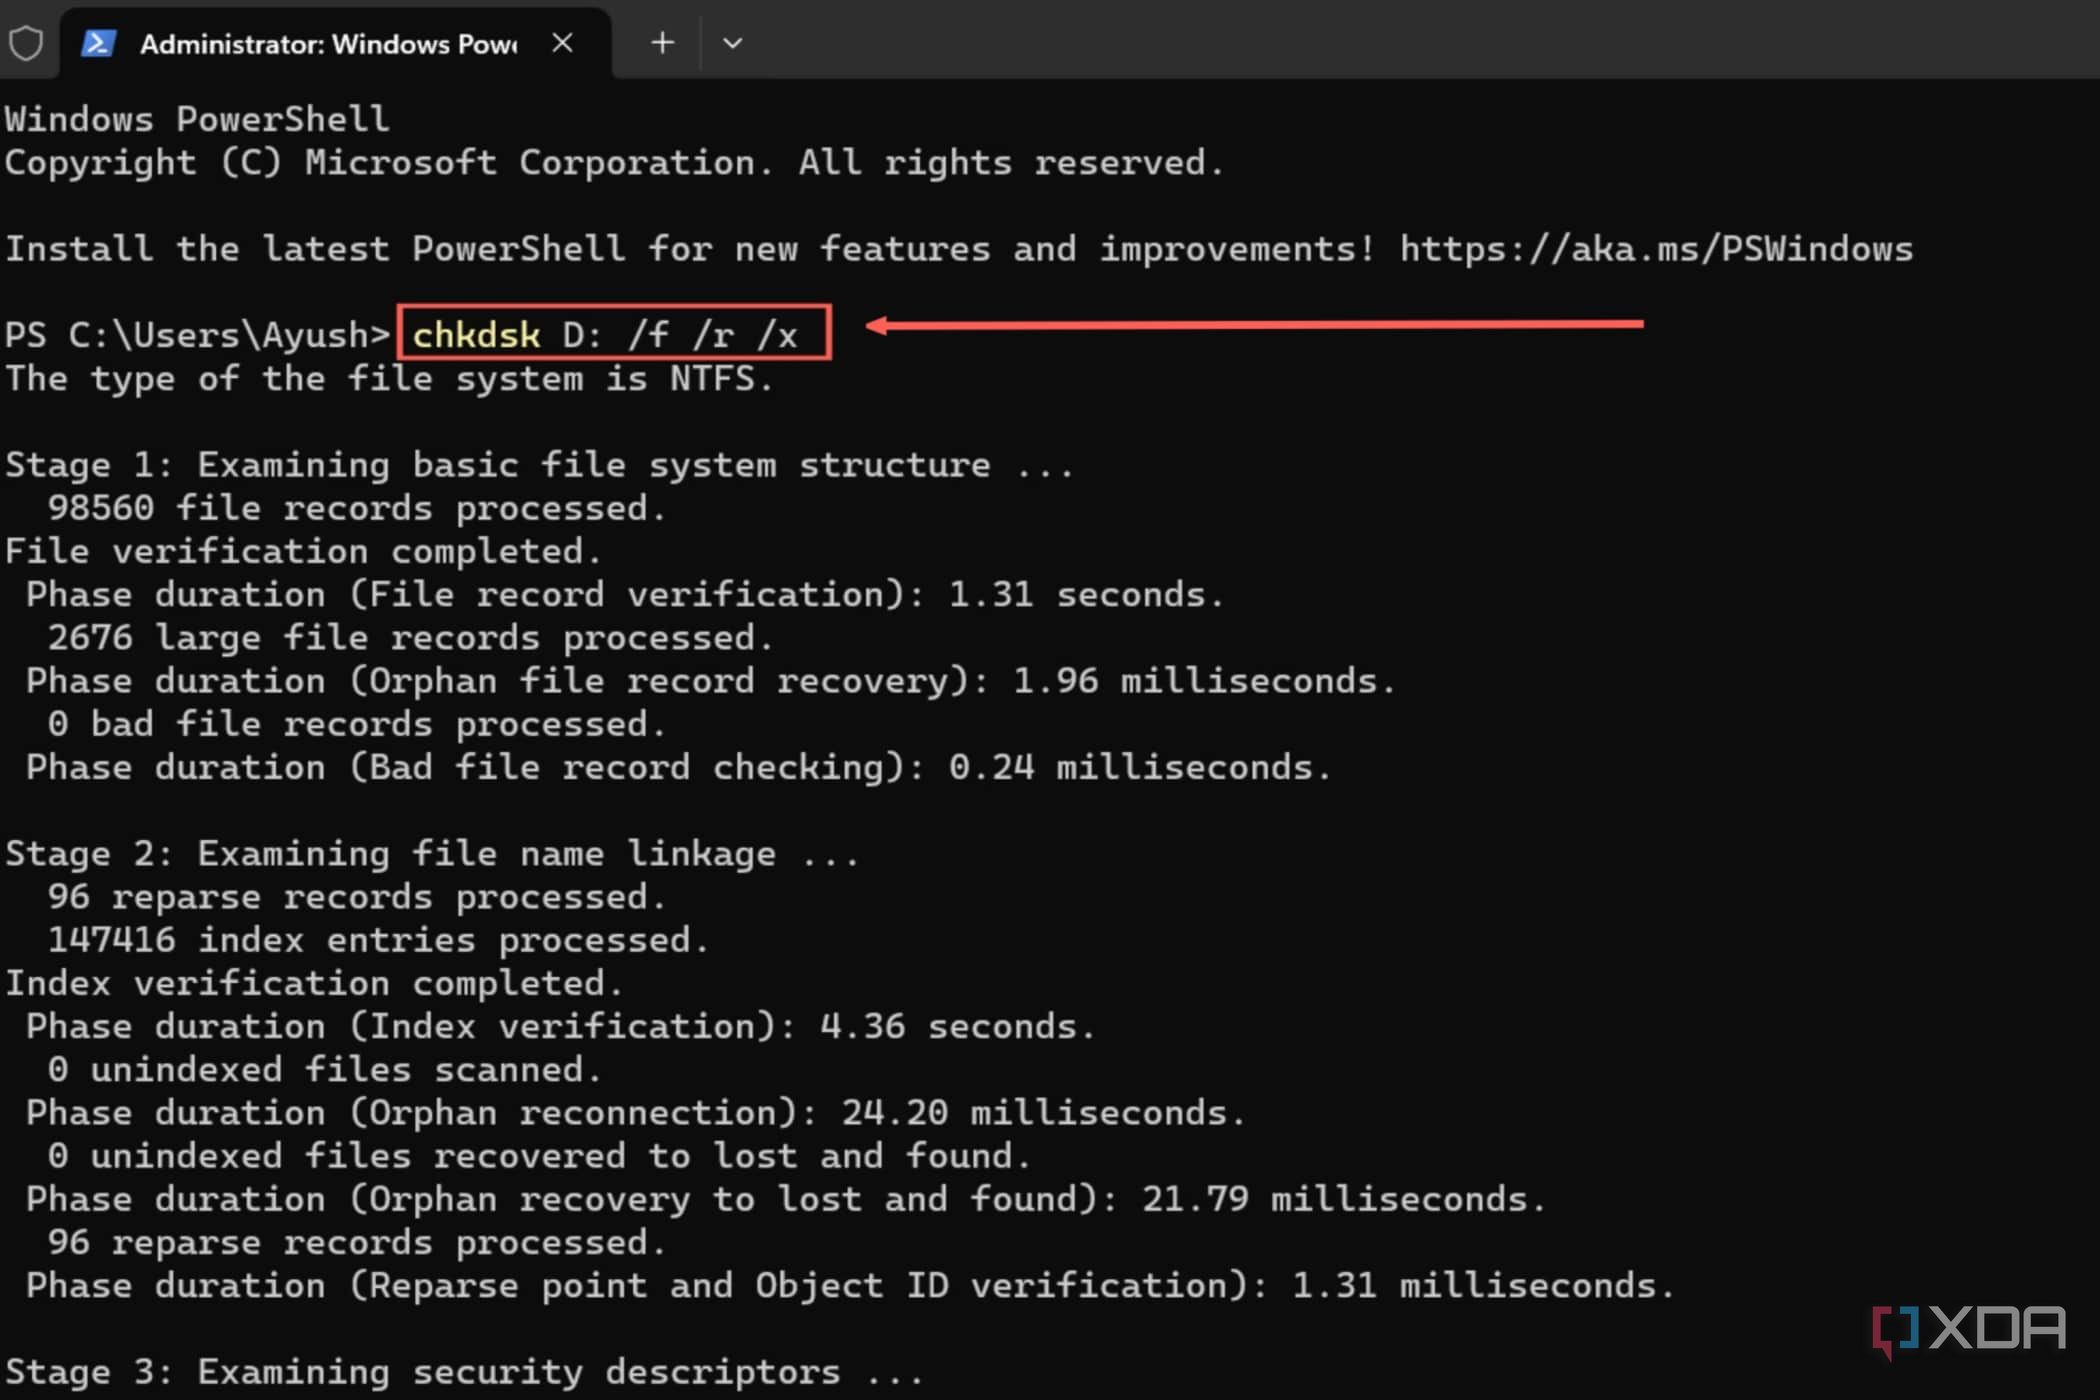
Be sure to replace drive_name with the driver letter of the faulty SSD.
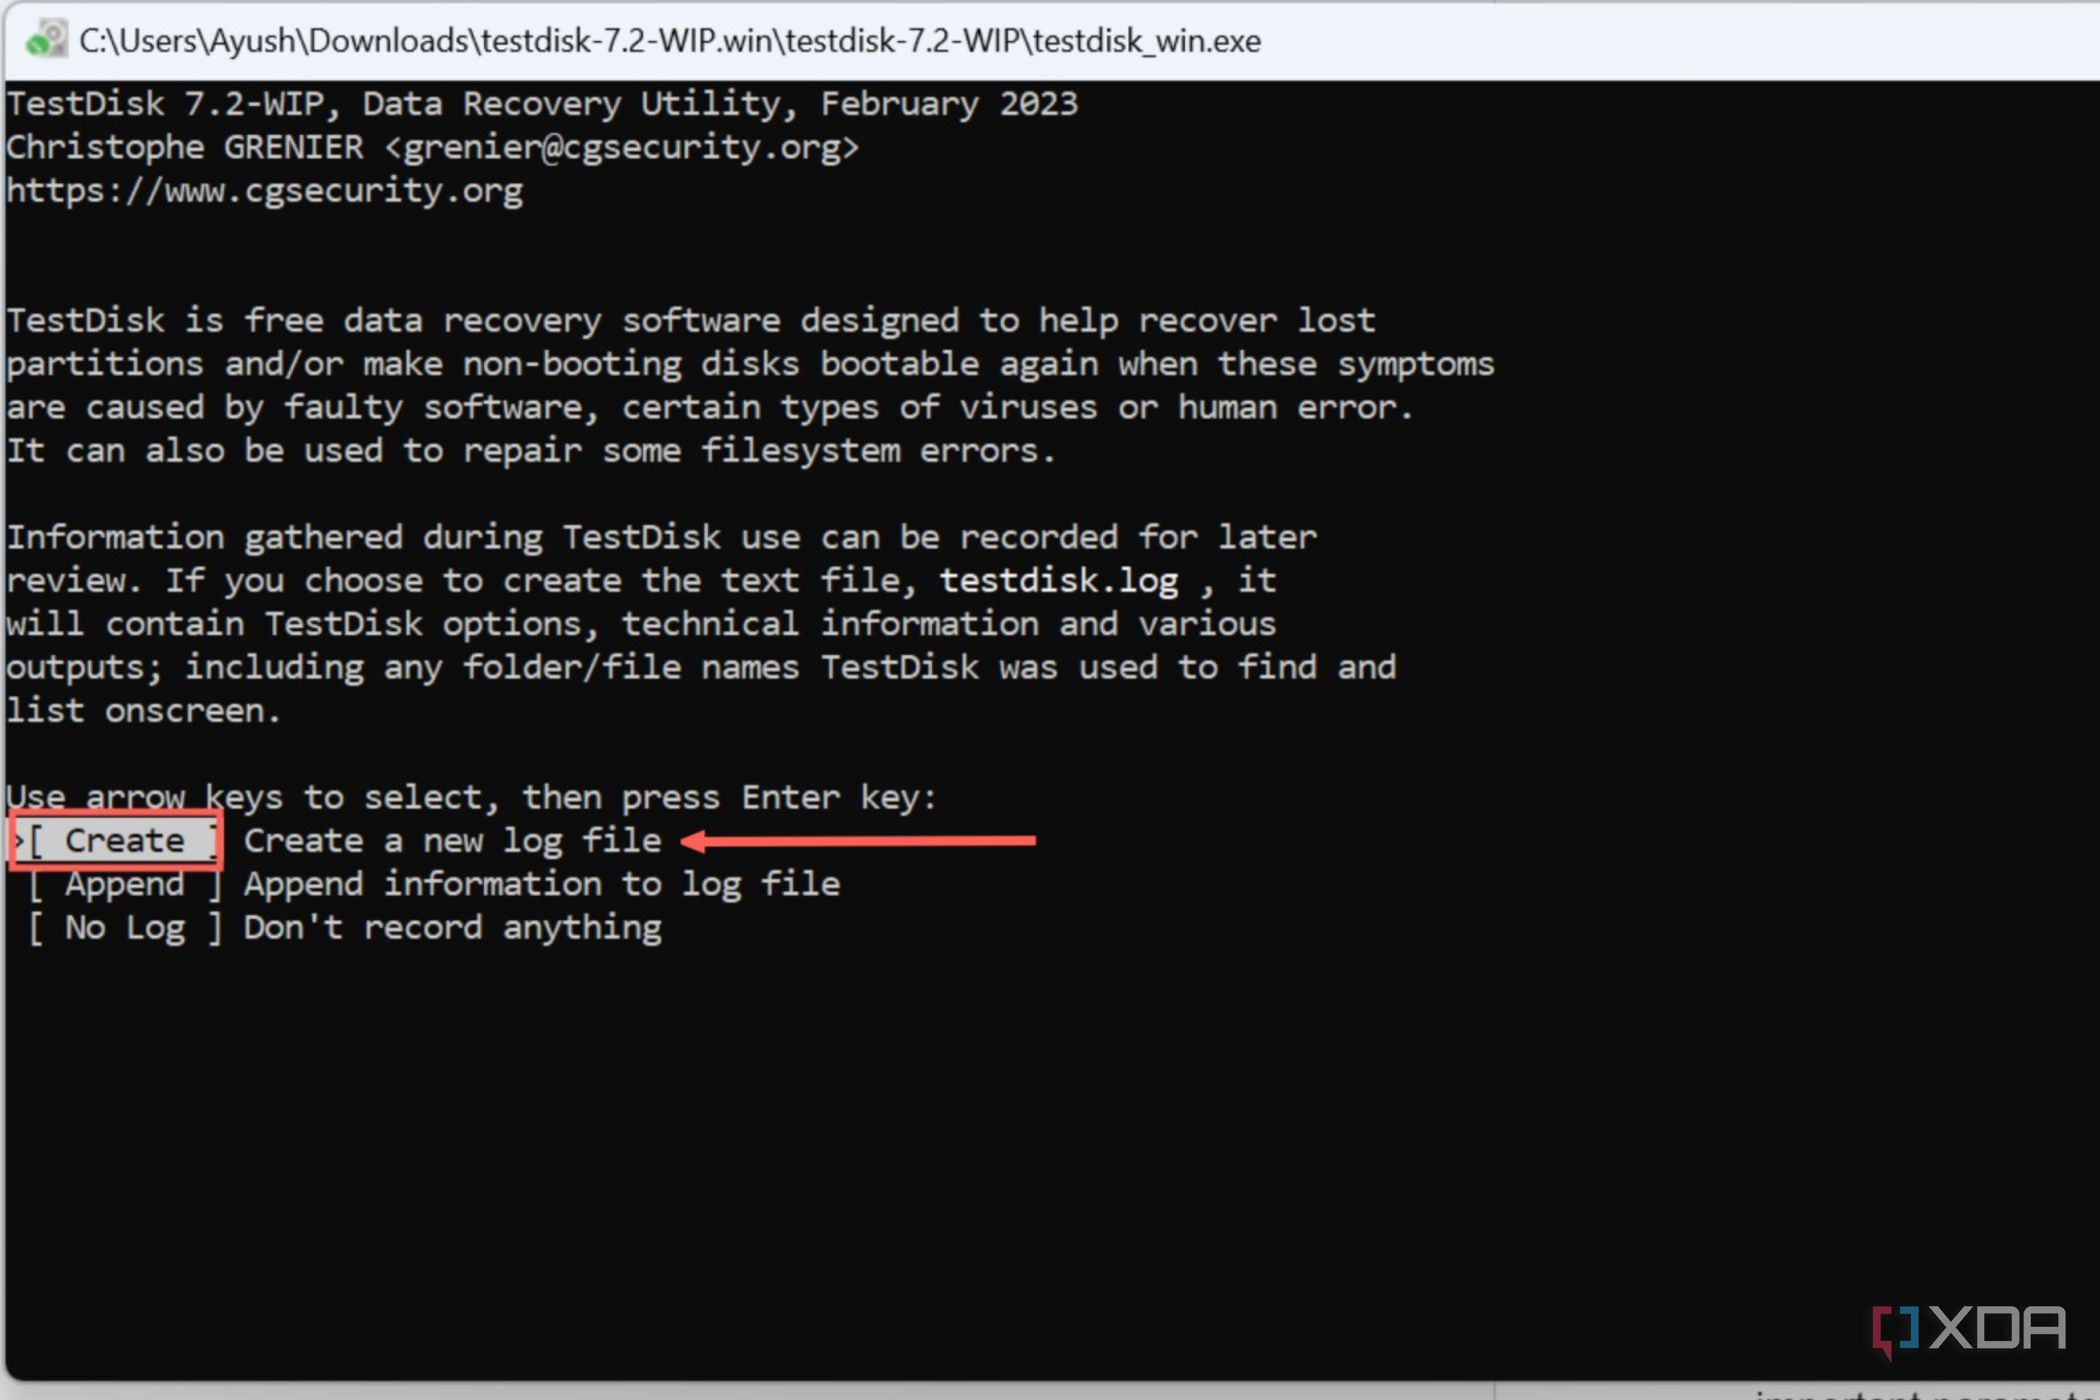
How to fix your SSD using TestDisk
If there’s an issue with the MBR and recovery partitions of your boot drive, you can recover them using the TestDisk utility. Since it’s not included in the Terminal by default, you’ll have to manually download TestDisk and launch the Terminal from its folder.
- Download TestDisk from the official website and extract the contents of the .zip folder.
- Run testdisk_win.exe as an administrator.
- With the Create option highlighted, press Enter to create a log file.
- Choose the malfunctioning SSD from the list of drives and hit Enter to proceed to the next step.
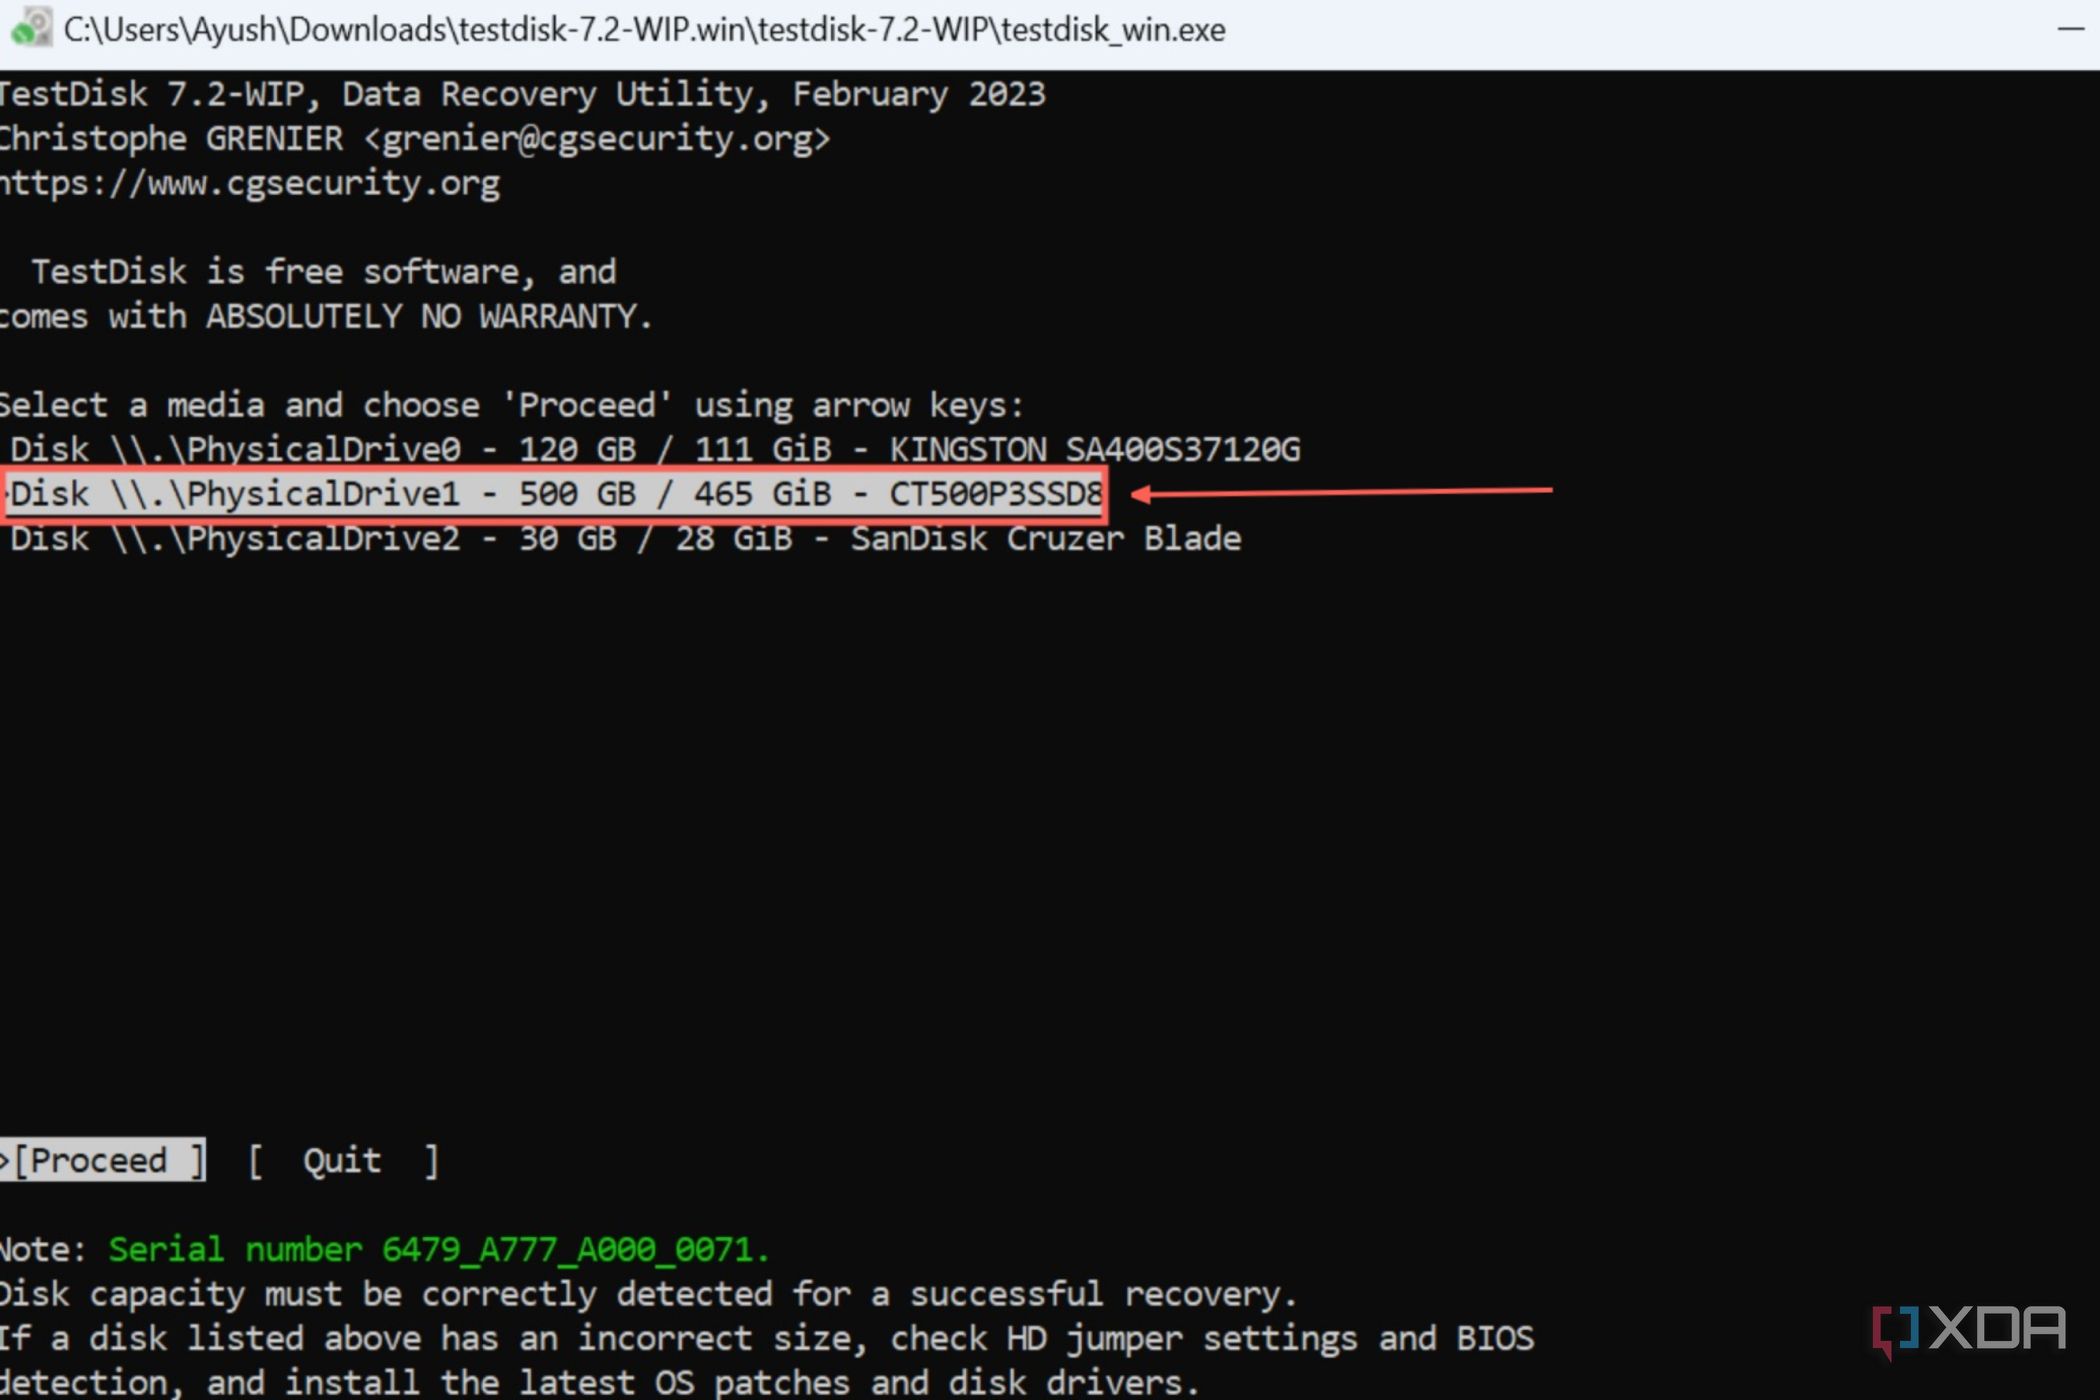
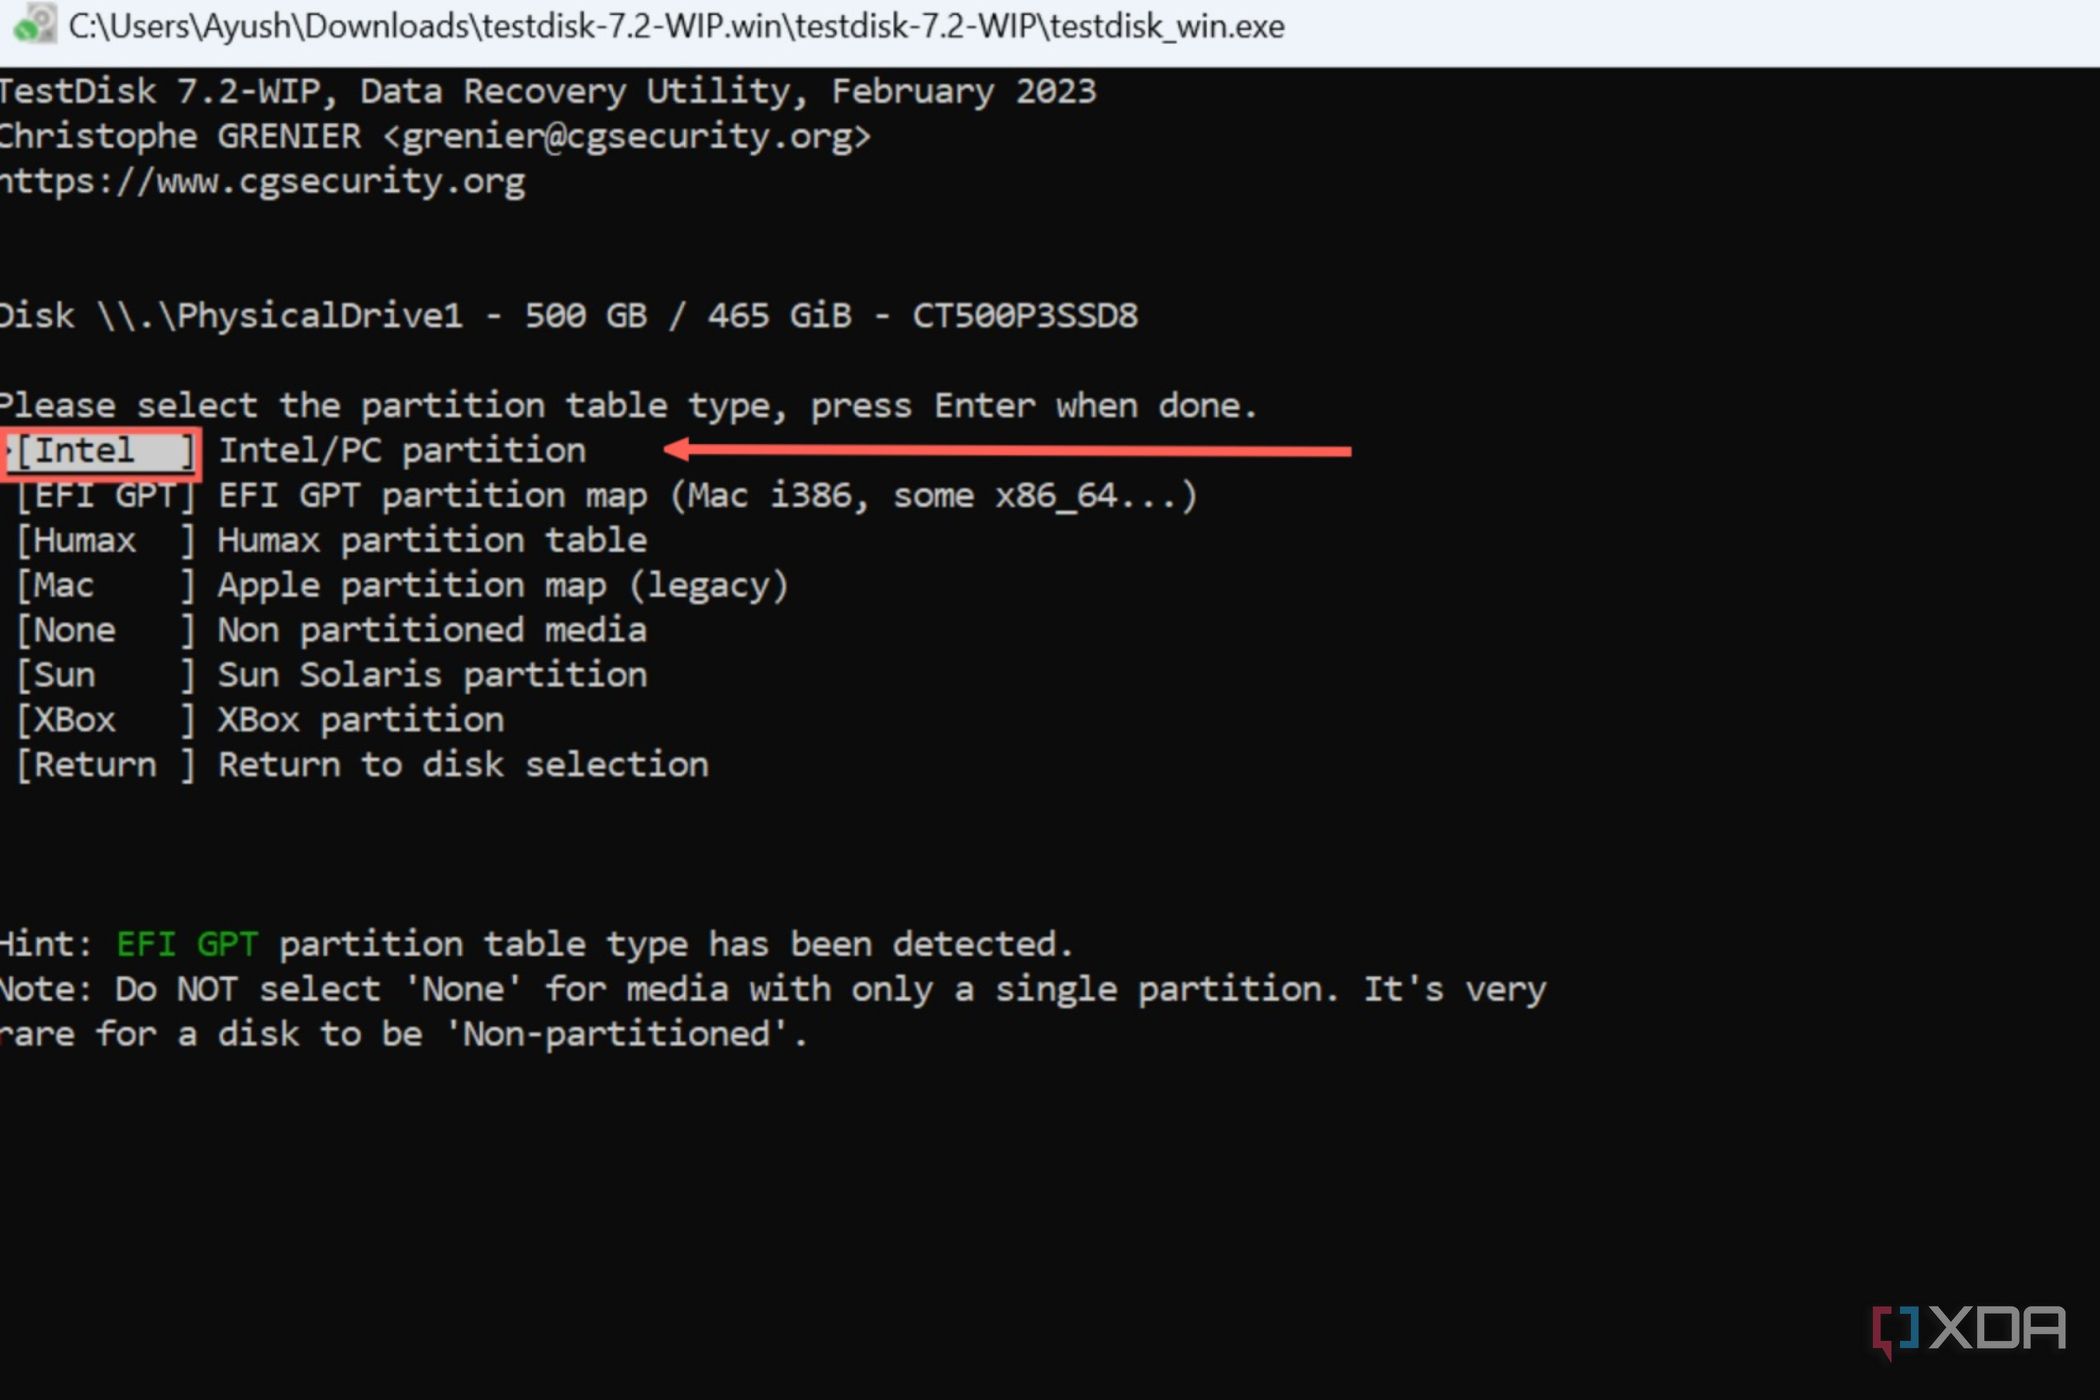
- Pick Intel as the partition table type and press Enter.
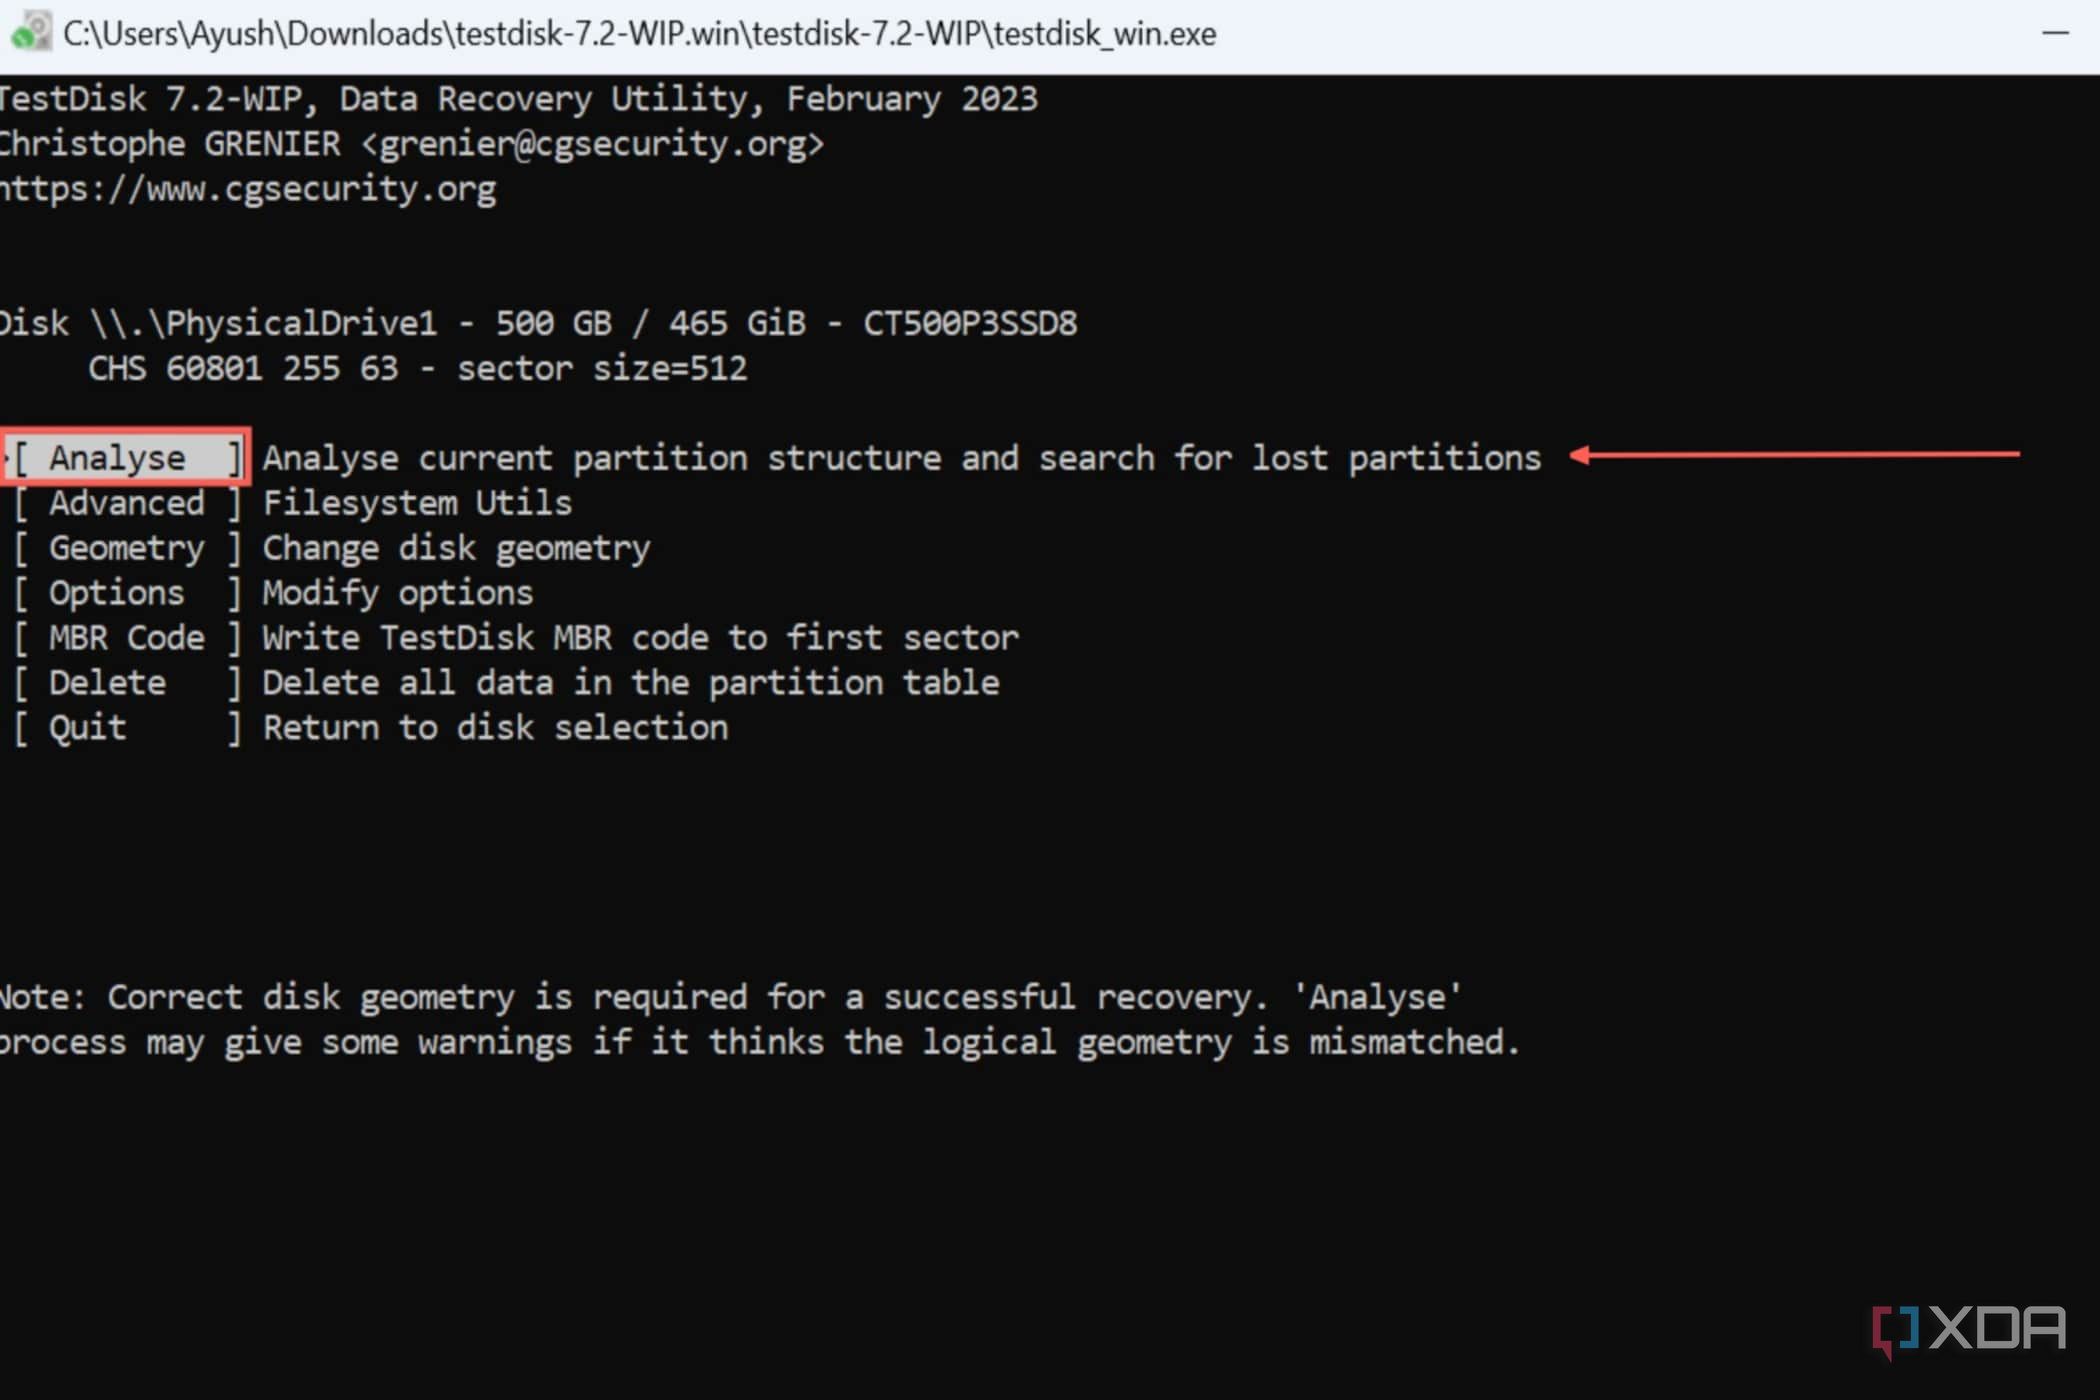
- Switch to Analyse and tap Enter.
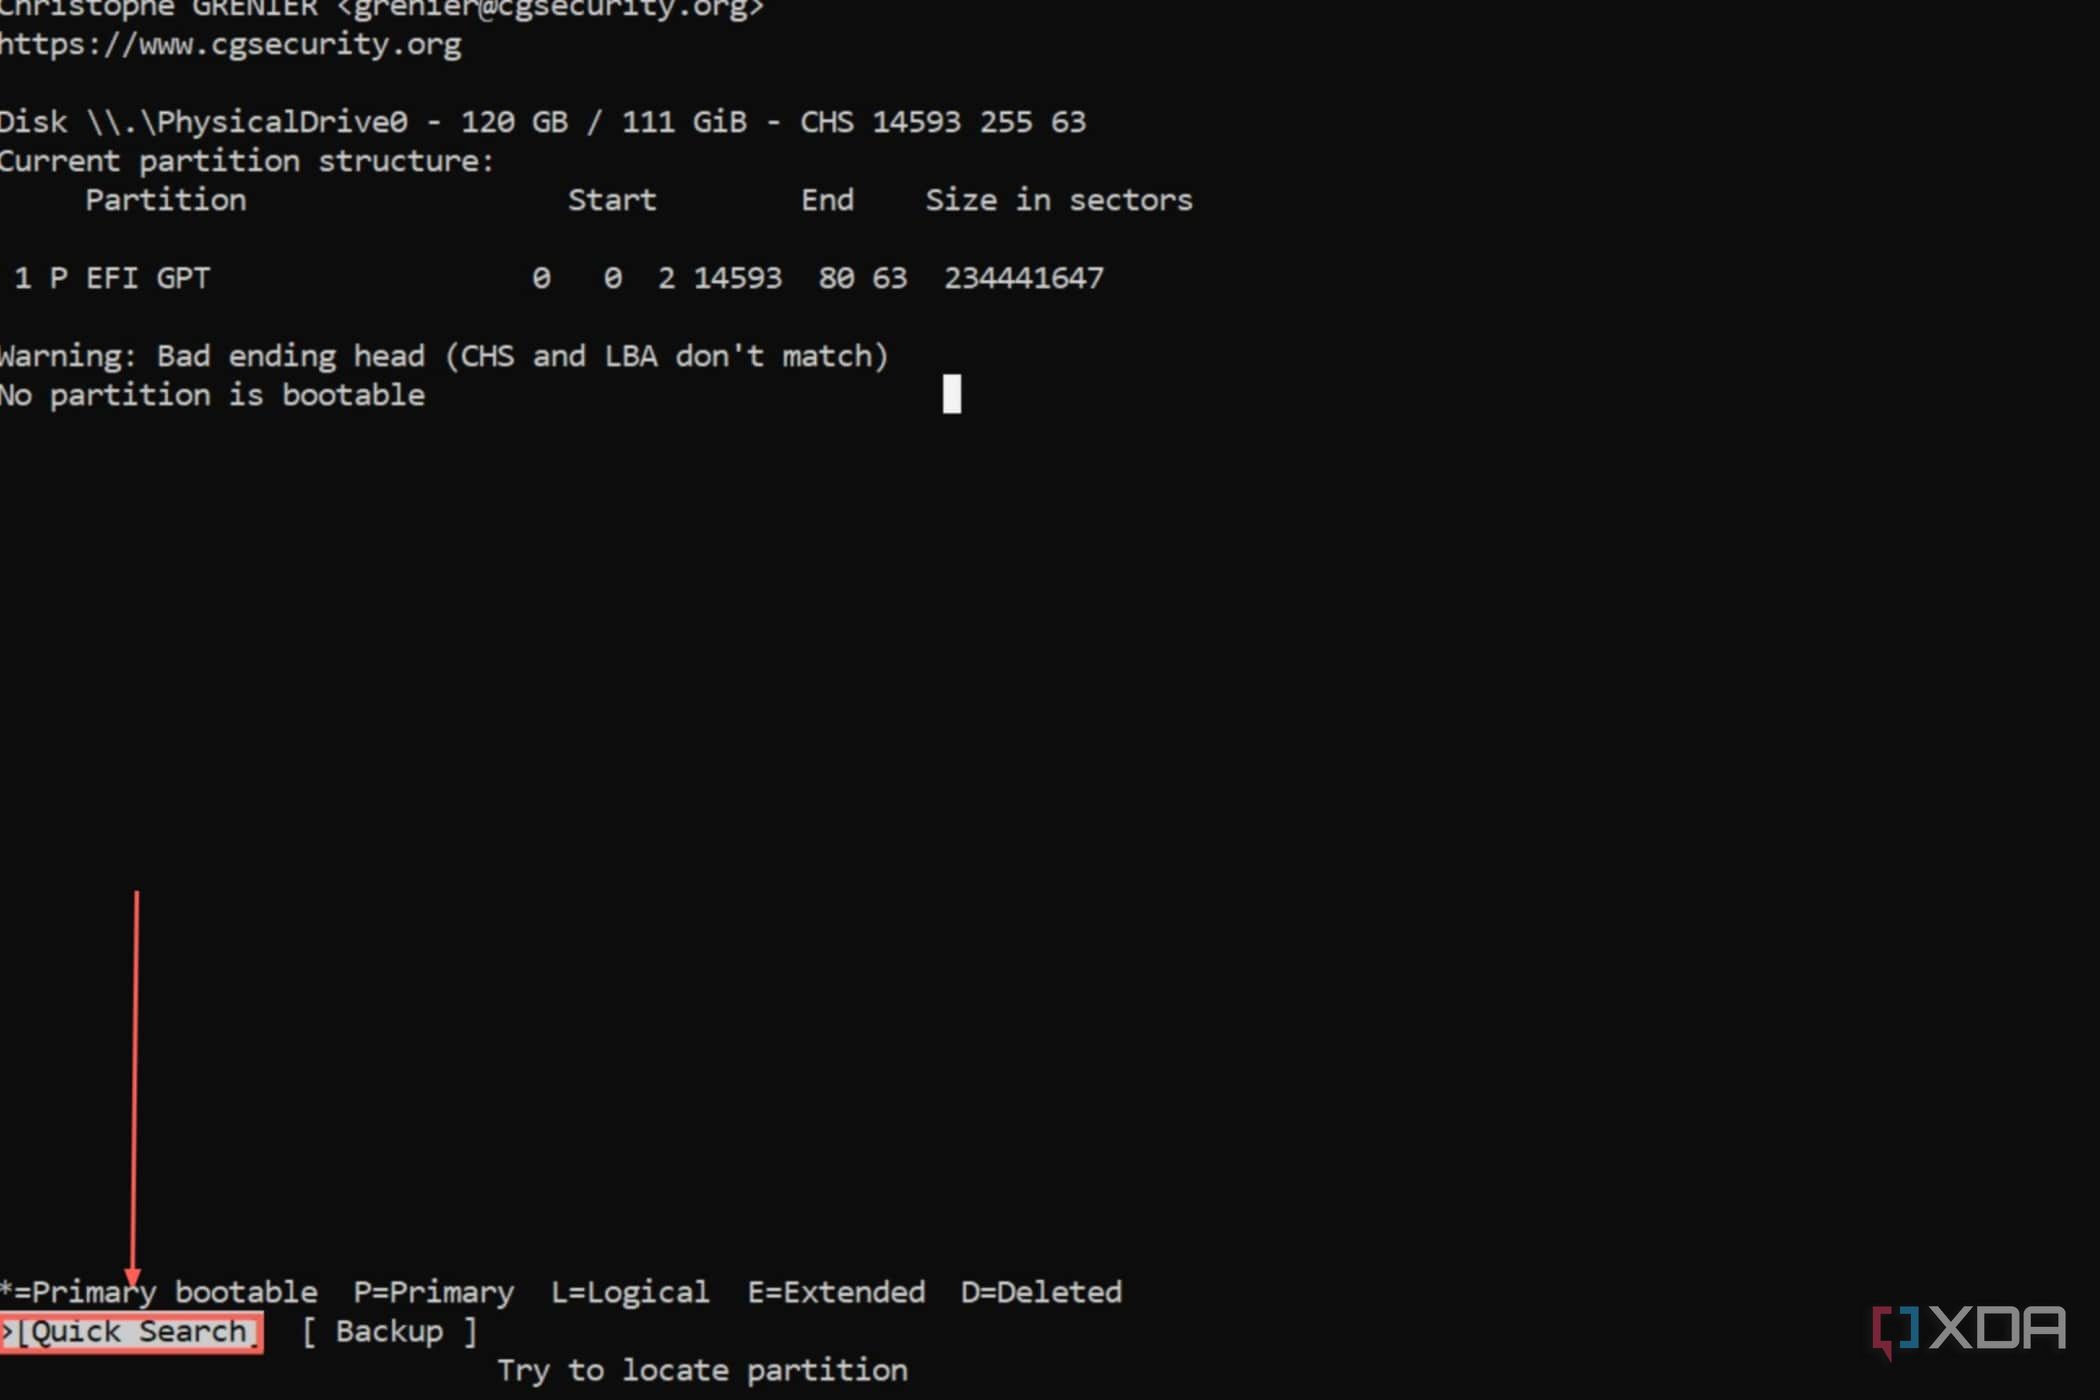
- Select Quick Search and, after pressing Enter, wait for the app to scan the partitions.
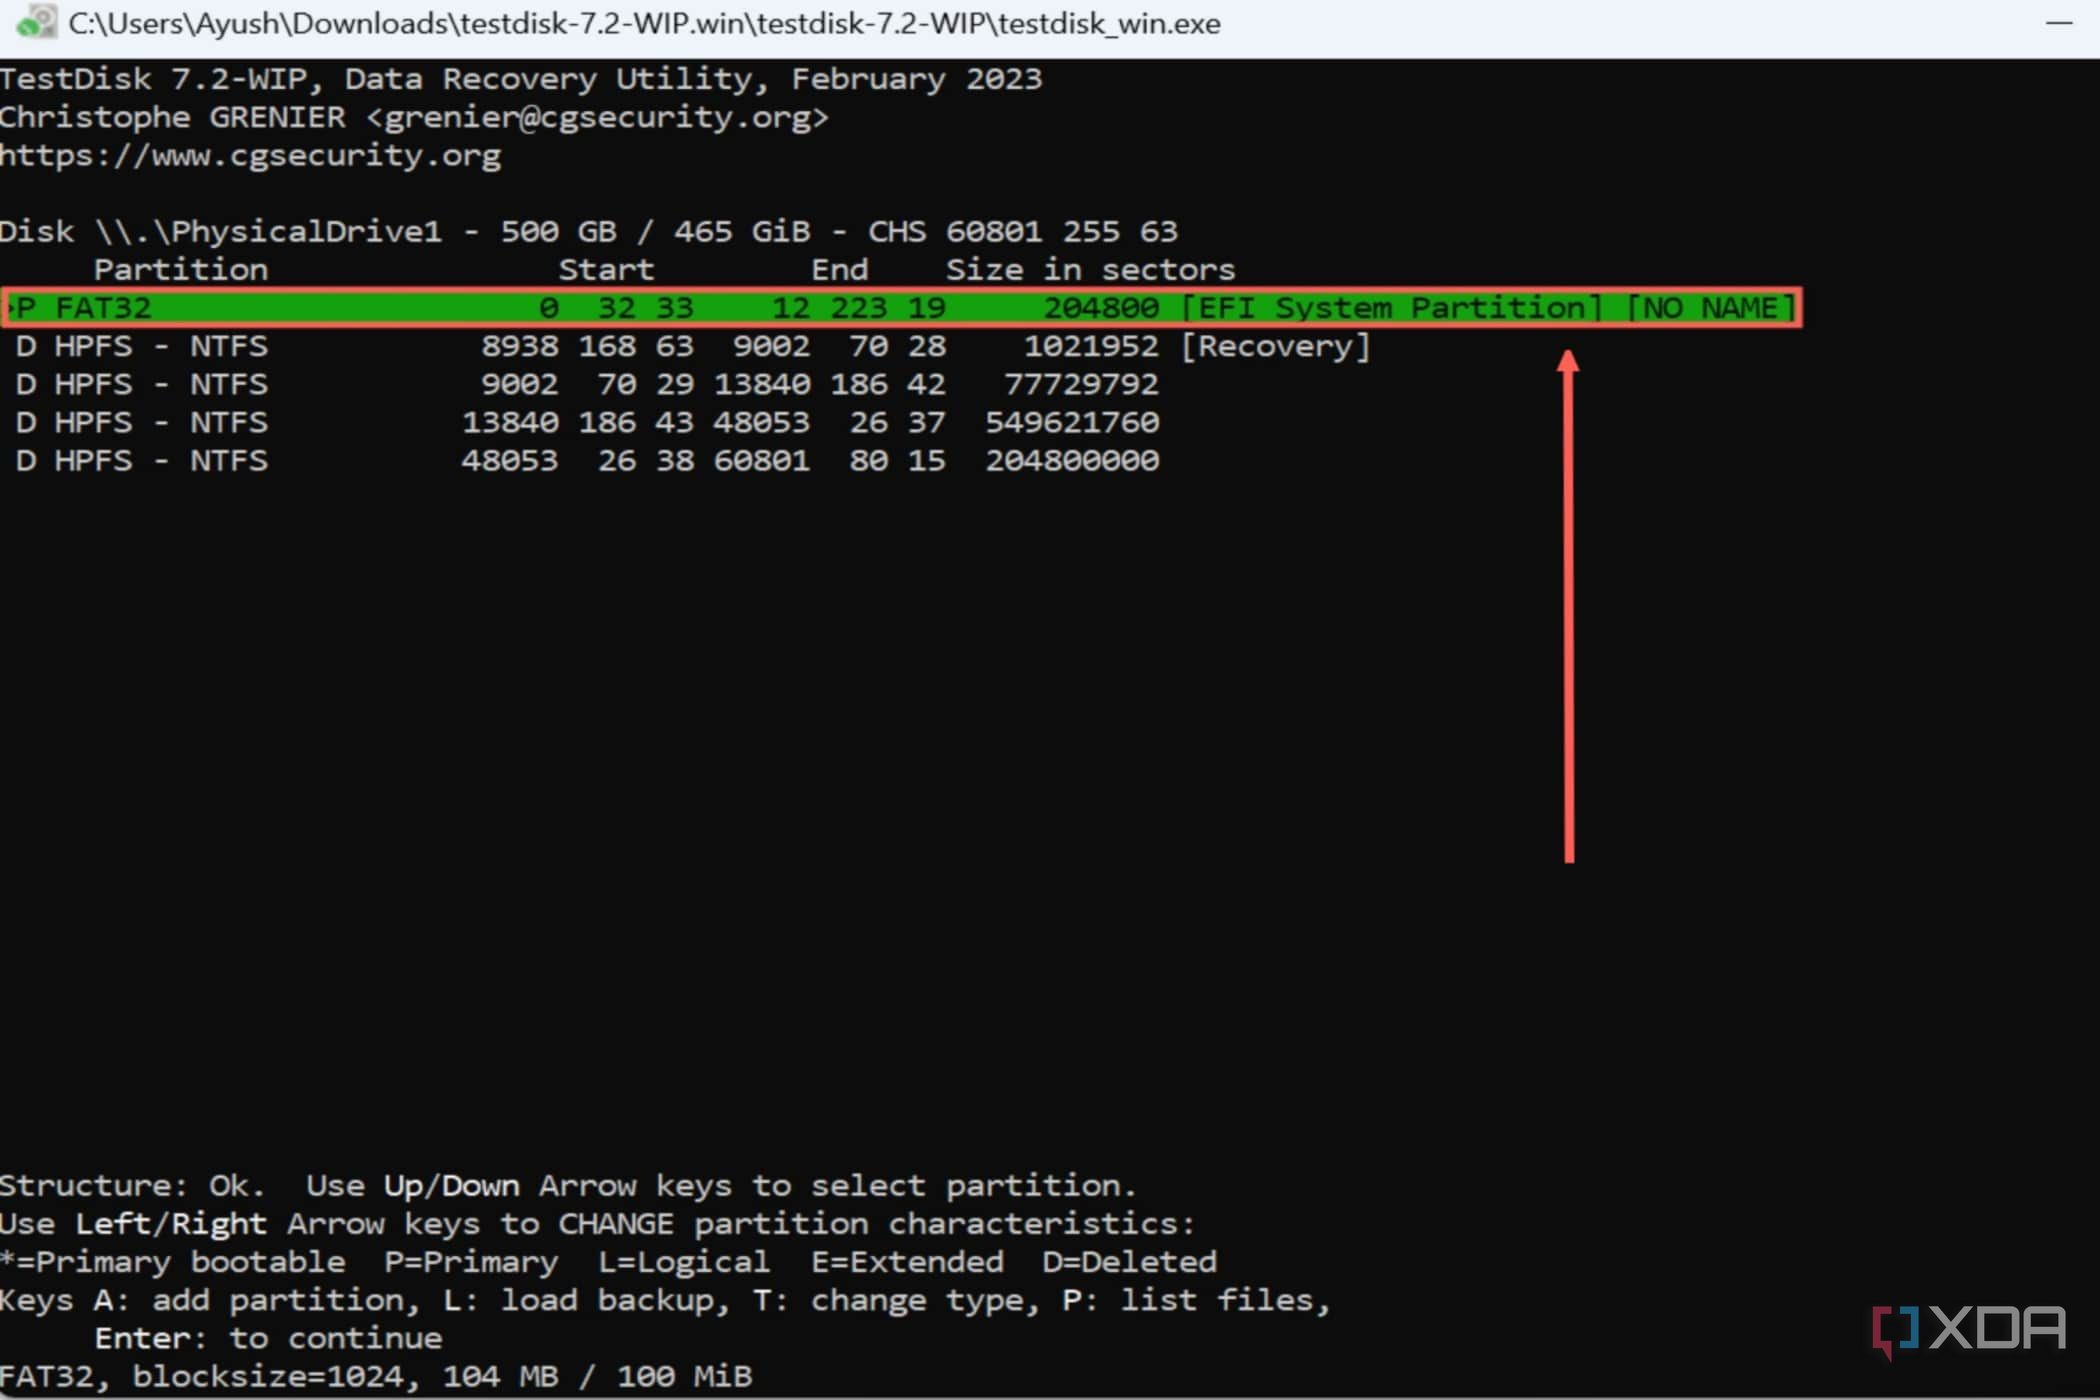
- Once TestDisk loads the partitions, you’ll notice the deleted partitions have a D prefix. Use the arrow keys to change the prefix from D to P, and press Enter.
- Switch to the Write option and hit Enter.
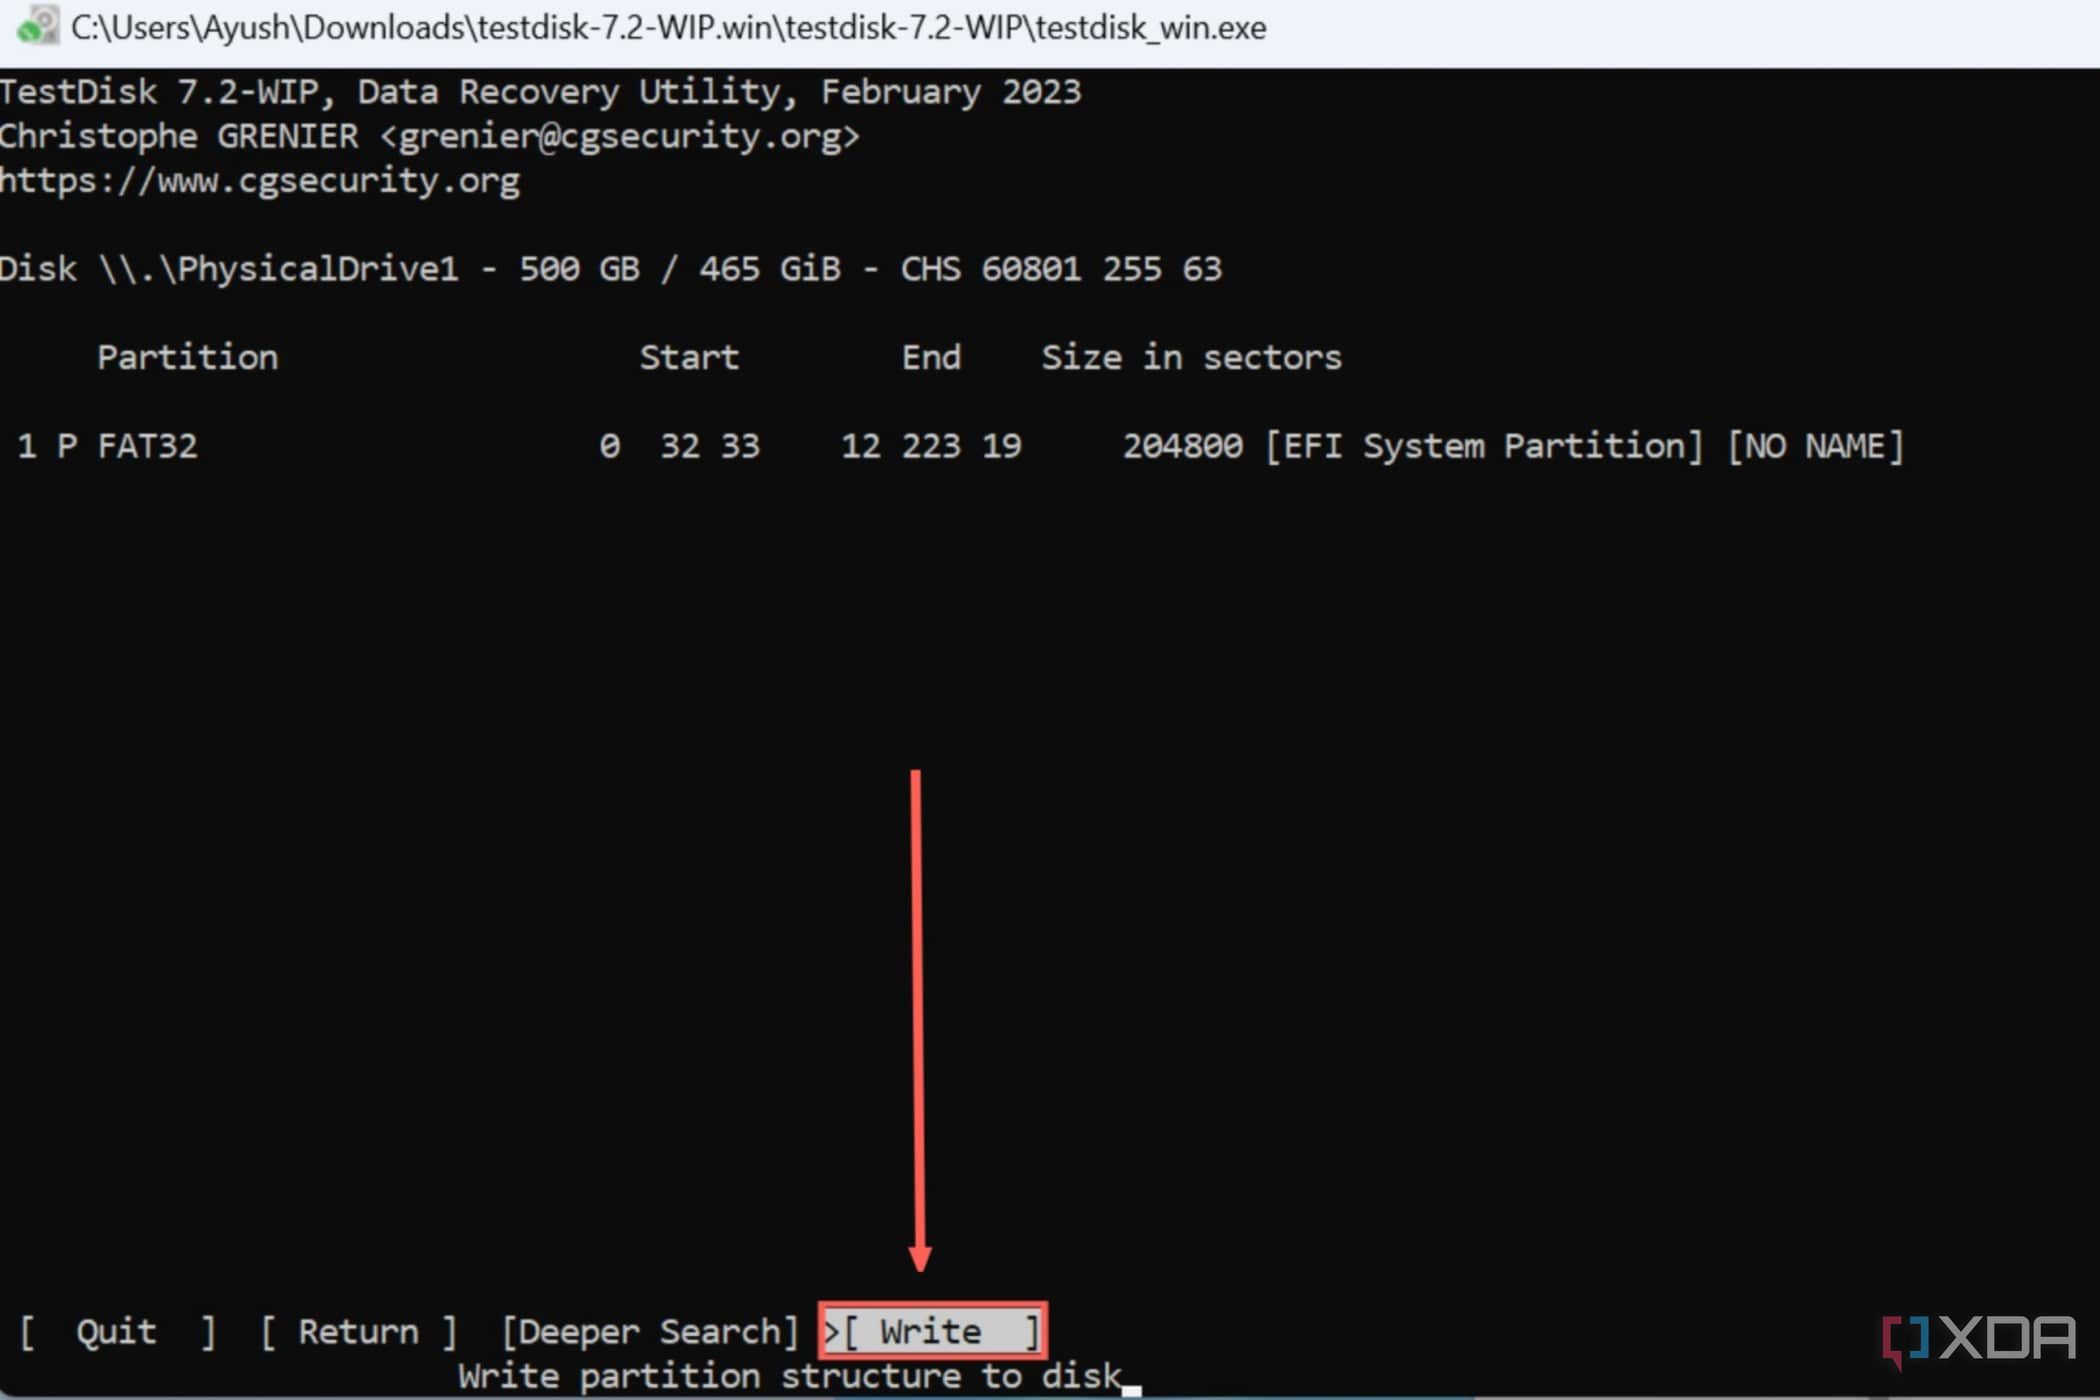
- Tap Y when prompted for confirmation and press Enter one last time.
How to fix your SSD using Disk Management
If none of these methods fixed your SSD, the drive may have bad sectors. While it’s easy to resolve these issues in hard drives, bad sectors are especially harmful to SSDs as they are difficult to fix and almost always lead to drive failures. But if you want to continue using the drive, you can format its contents as a last resort.
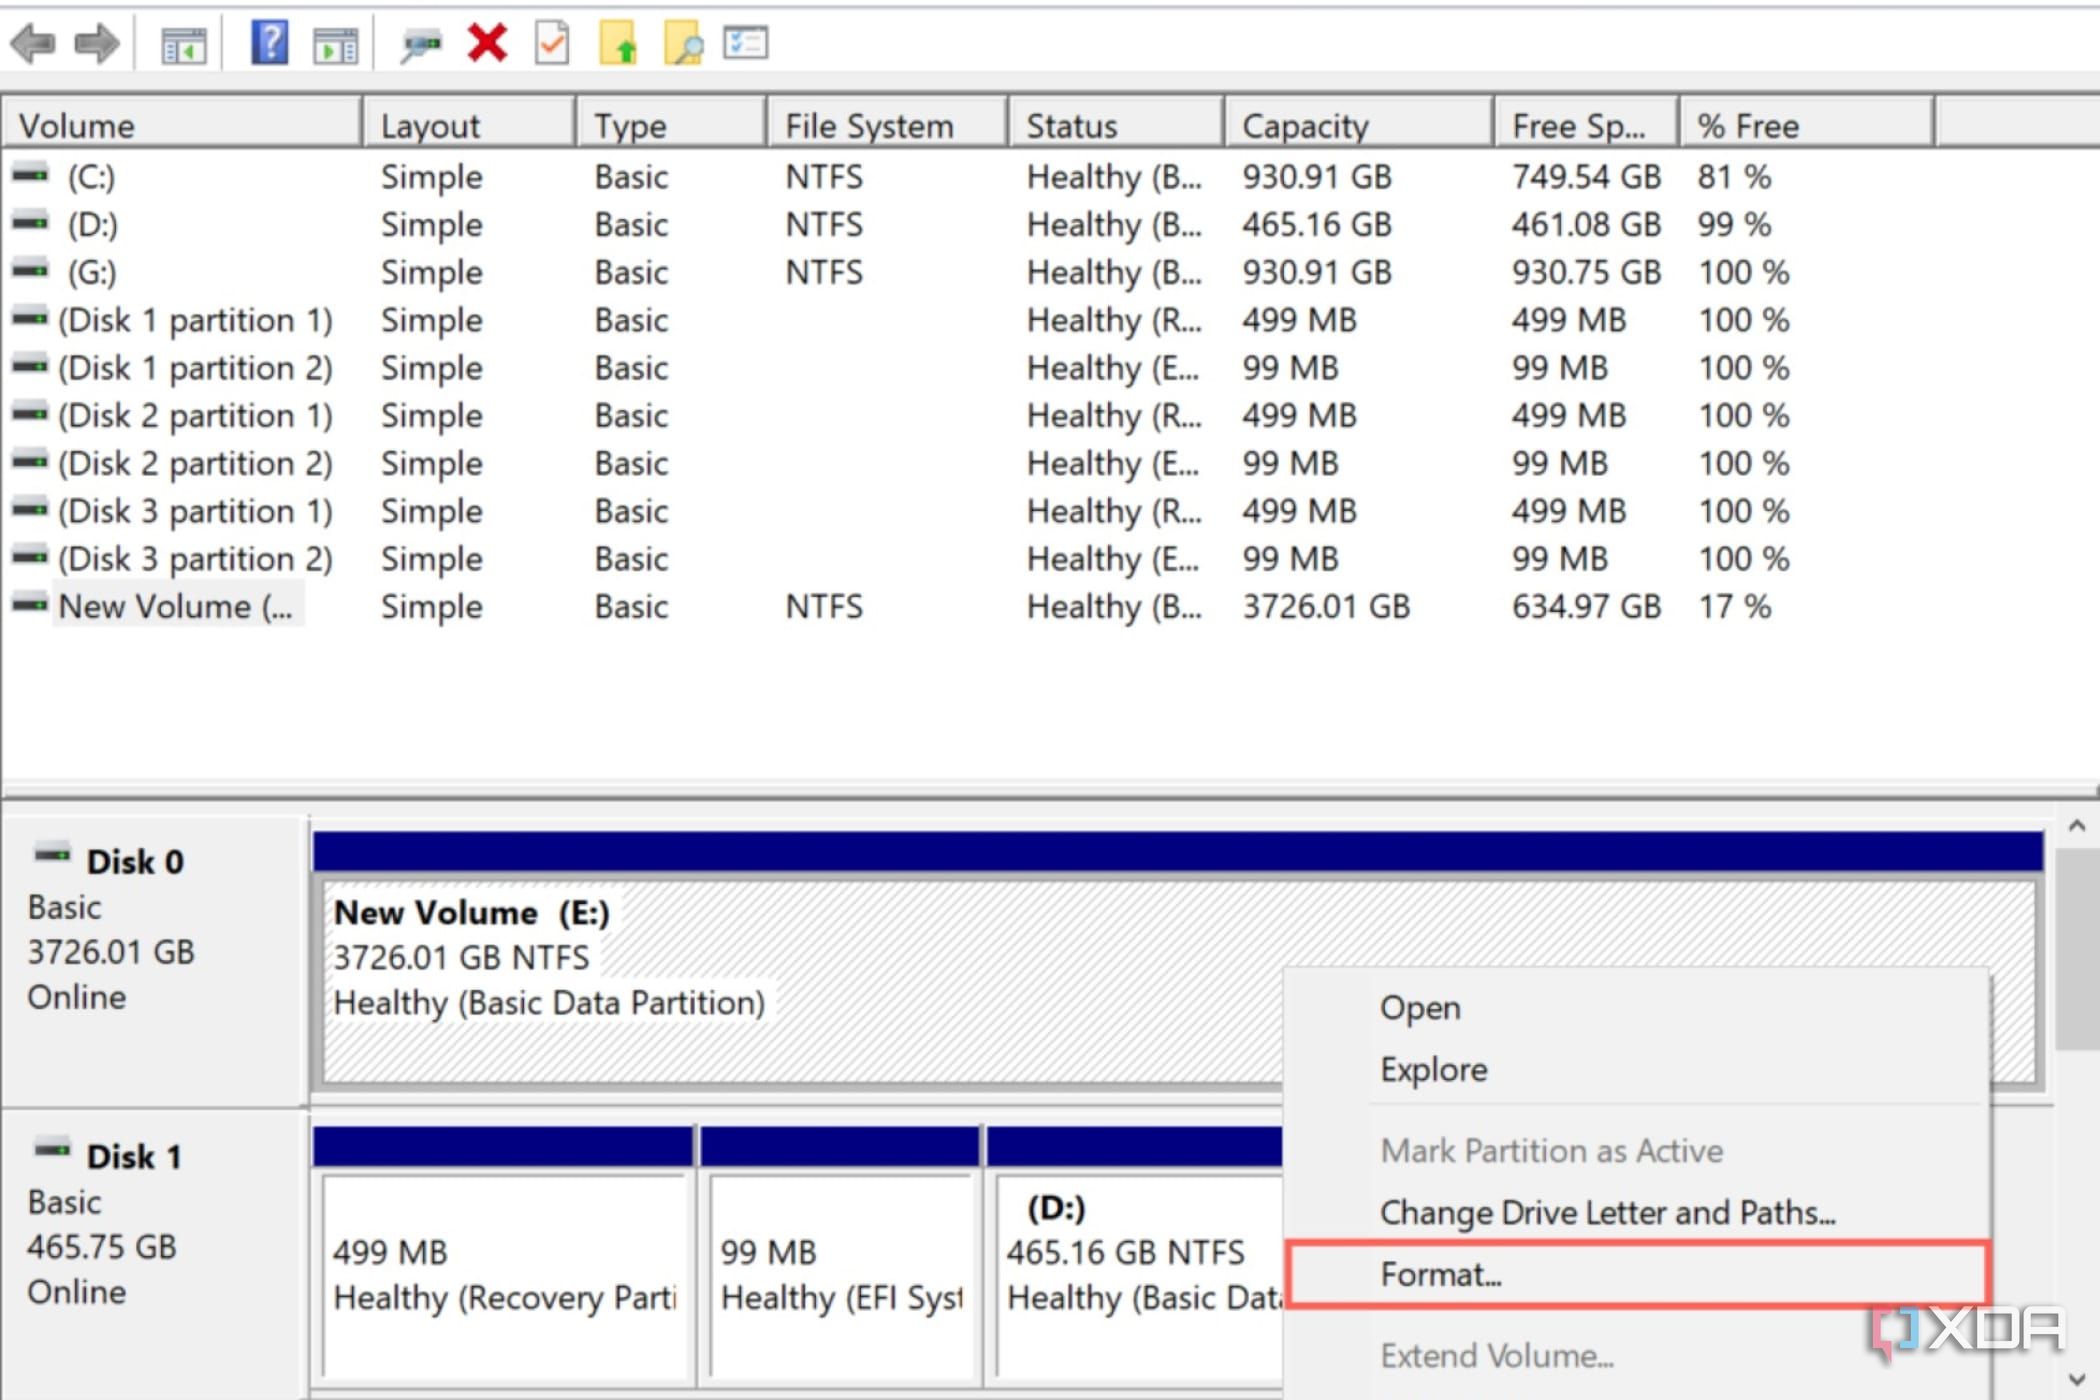
- Right-click on the Start button and select Disk Management.

- Right-click on your defective SSD and choose Format.
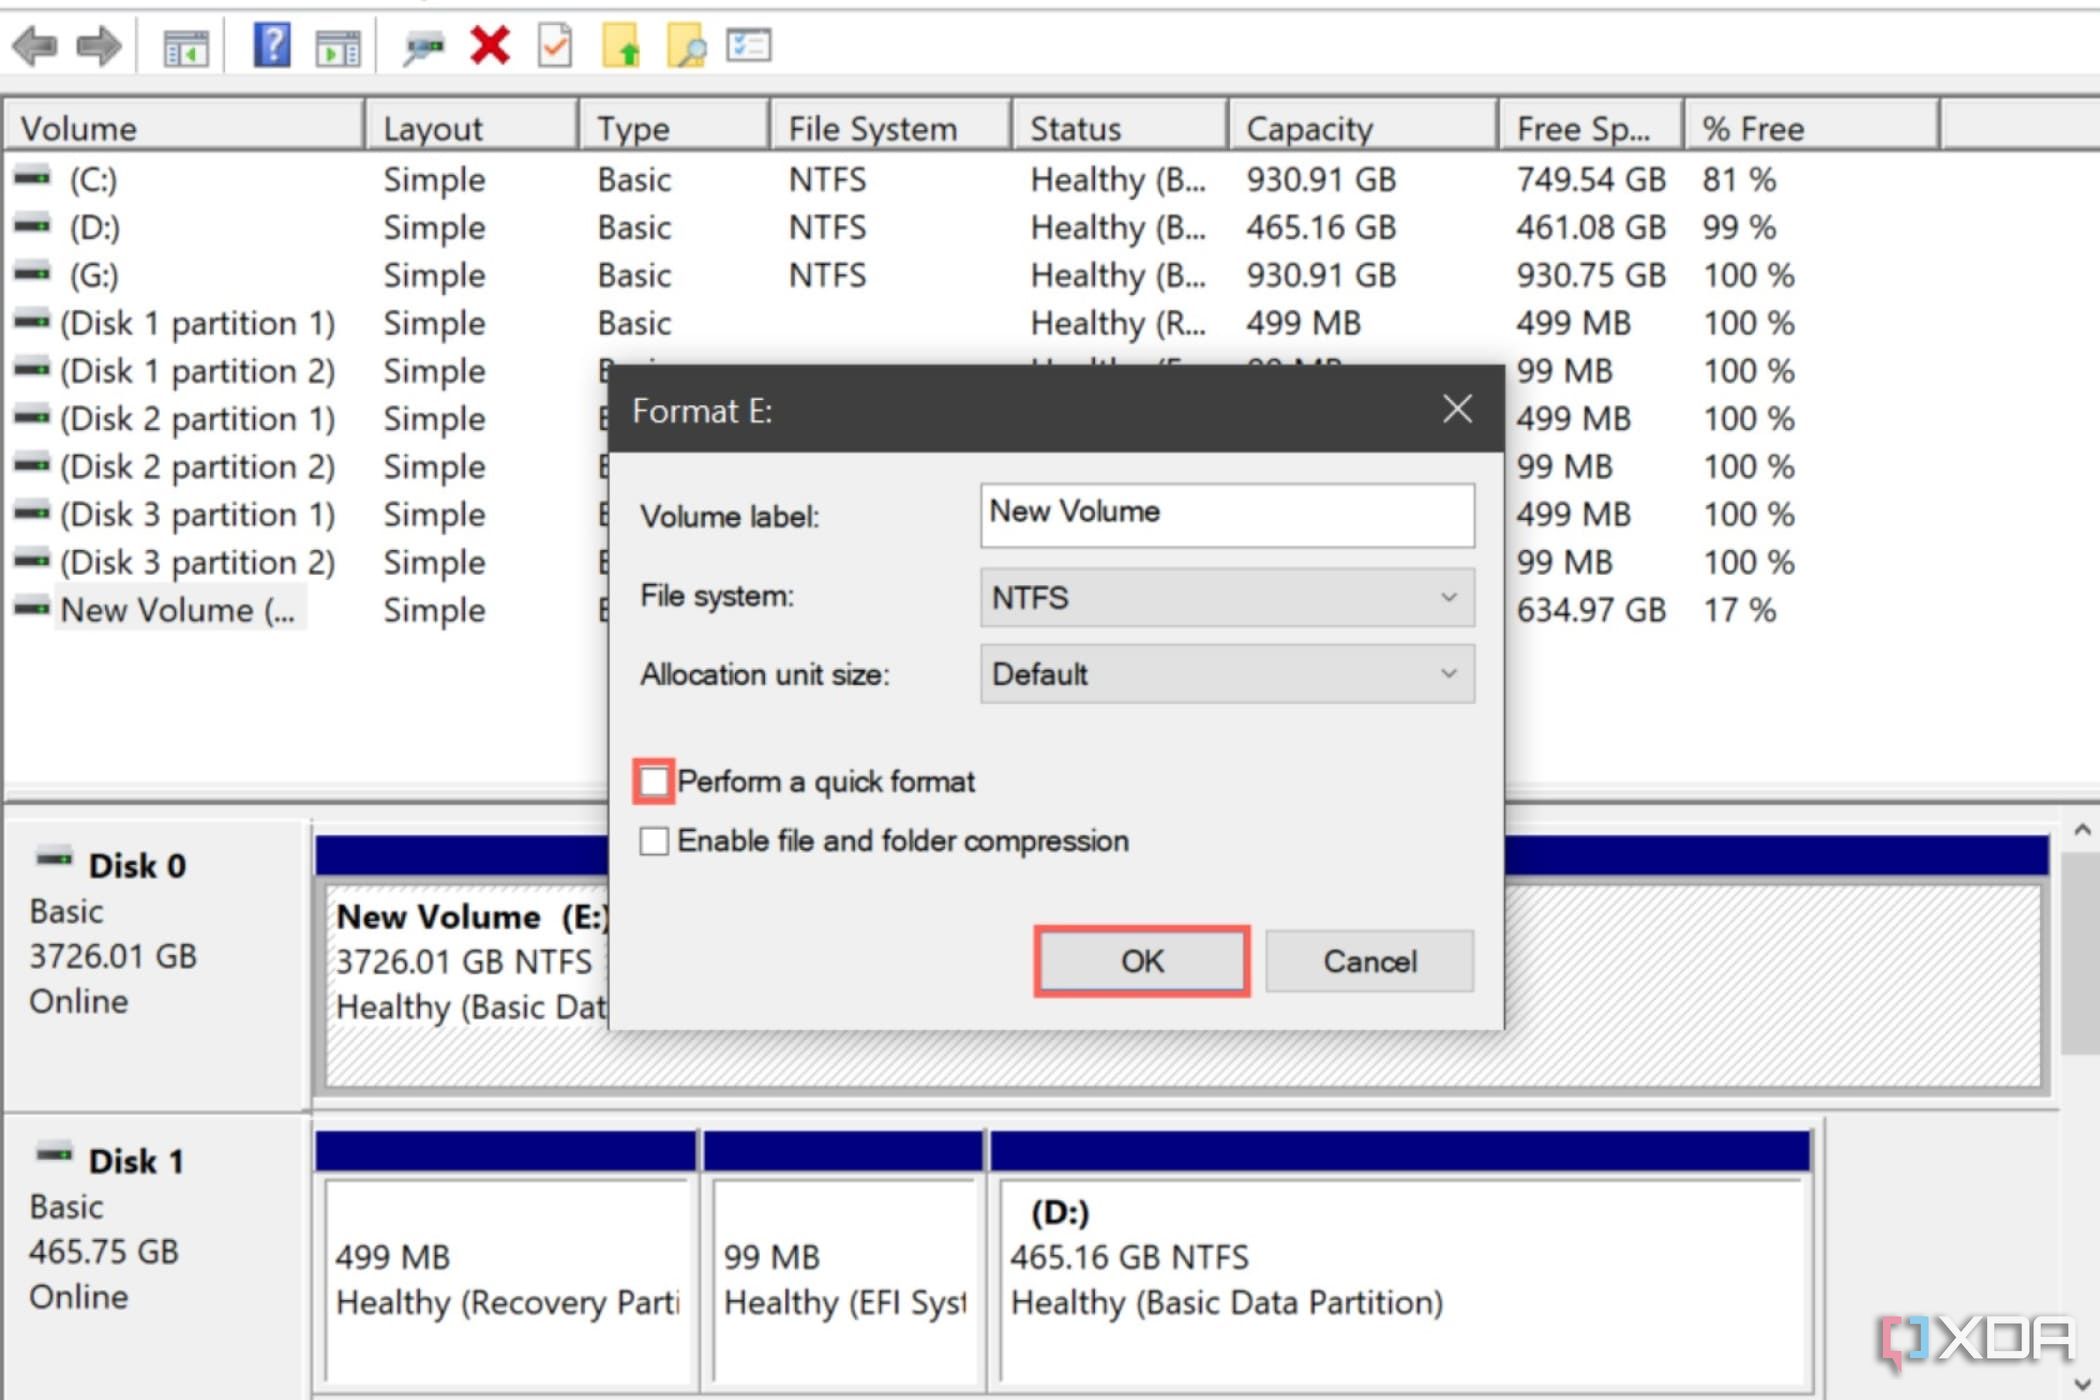
- Since we want the drive to check for bad sectors, deselect the Perform a quick format option and press OK.
Is your SSD working properly?
If you’ve followed the steps carefully, your SSD should become functional again. However, there’s no certainty when the errors may crop up again, and the best “fix†for a malfunctioning SSD is to replace it with a new one as soon as possible.
Fortunately, SSDs are no longer as expensive as they used to be, and if you keep an eye out for deals, you can nab a decent 1TB drive for under $100. You can also browse the best SSDs of 2023 if you need help picking out new drives for your system.
** (Disclaimer: This video content is intended for educational and informational purposes only) **
More...
